
How to Create a WhatsApp Broadcast Message and Reply with AI
In this article we're going to show you how to easily create a WhatsApp Broadcast message and then automate your replies with AI to qualify and score your responses. After this article, you'll be able to handoff your WhatsApp broadcast message replies to your AI Chatbot to automatically qualify your leads and escalate the warm ones directly to your team - so only the hot leads get transferred to your team. Your chatbot can answer product questions, ask qualifying questions, and hand conversations to your team in Microsoft Teams, Slack, Google Chat, or the Social Intents web inbox.
Each recipient receives a private, one-to-one WhatsApp message. Replies become individual conversations, so customers don't see your other recipients.
Before you begin
- A Social Intents account, or a free trial.
- A Meta business portfolio and permission to connect your WhatsApp Business Account.
- A WhatsApp Business phone number you can verify. If you already use the WhatsApp Business app, you can connect an eligible number using coexistence mode.
- A valid payment method for your WhatsApp Business Account.
- A Social Intents chat widget to handle incoming WhatsApp messages and run your AI chatbot.
- Contacts who agreed to receive your WhatsApp marketing messages, with a record of how they opted in.
- Product information and qualification criteria for your chatbot.
You'll also need a Meta-approved Marketing template before sending the outbound campaign described here. We'll create that template below.
US recipients: Social Intents currently flags US phone numbers as ineligible for WhatsApp Marketing templates because of Meta's marketing-message pause. Review the Reach panel before sending. SMS fallback requires a connected Twilio setup and separate SMS consent. Do not classify a promotion as Utility to bypass a restriction.
What you'll set up
- Connect your WhatsApp number to Social Intents.
- Verify your configuration and Meta payment method.
- Configure your AI chatbot to answer and qualify replies.
- Create an approved outbound Marketing template.
- Add your contacts and create an audience.
- Create, test, and schedule your broadcast.
- Manage replies with AI and hand qualified leads to your team.
1. Connect your WhatsApp number to Social Intents
- Sign in to Social Intents and open Integrations.
- Find the WhatsApp card and click Connect.
- Follow the prompts to open Meta's embedded signup.
- Sign in with the Meta account that manages your business. Authorize Social Intents and select or create your WhatsApp Business Account.
- Select your phone number and complete Meta's connection and verification steps.
Social Intents handles the Cloud API registration, webhook subscription, and connection credentials during setup. You don't need to build a webhook endpoint or manually configure the API for this workflow.
If you already use the WhatsApp Business app
Use WhatsApp coexistence mode if you want to keep the app active on your phone while connecting Social Intents.
Enter your existing WhatsApp Business app number in Meta's signup flow. When Meta offers to connect the existing app, choose to keep using it and scan the QR code from the WhatsApp Business app. Have your phone available and use an up-to-date app.
If you expected coexistence but Meta asks for SMS or voice verification instead of showing the app connection flow, stop and check the coexistence setup guide before continuing.
Route the number to the correct widget
- Open Settings > Channels.
- Expand WhatsApp.
- Under WhatsApp numbers, select the widget that should handle this number.
- Save your changes.
This mapping controls which AI chatbot handles replies. Configure the AI on the widget assigned to your sending number. If you use multiple numbers, verify the mapping for each one.
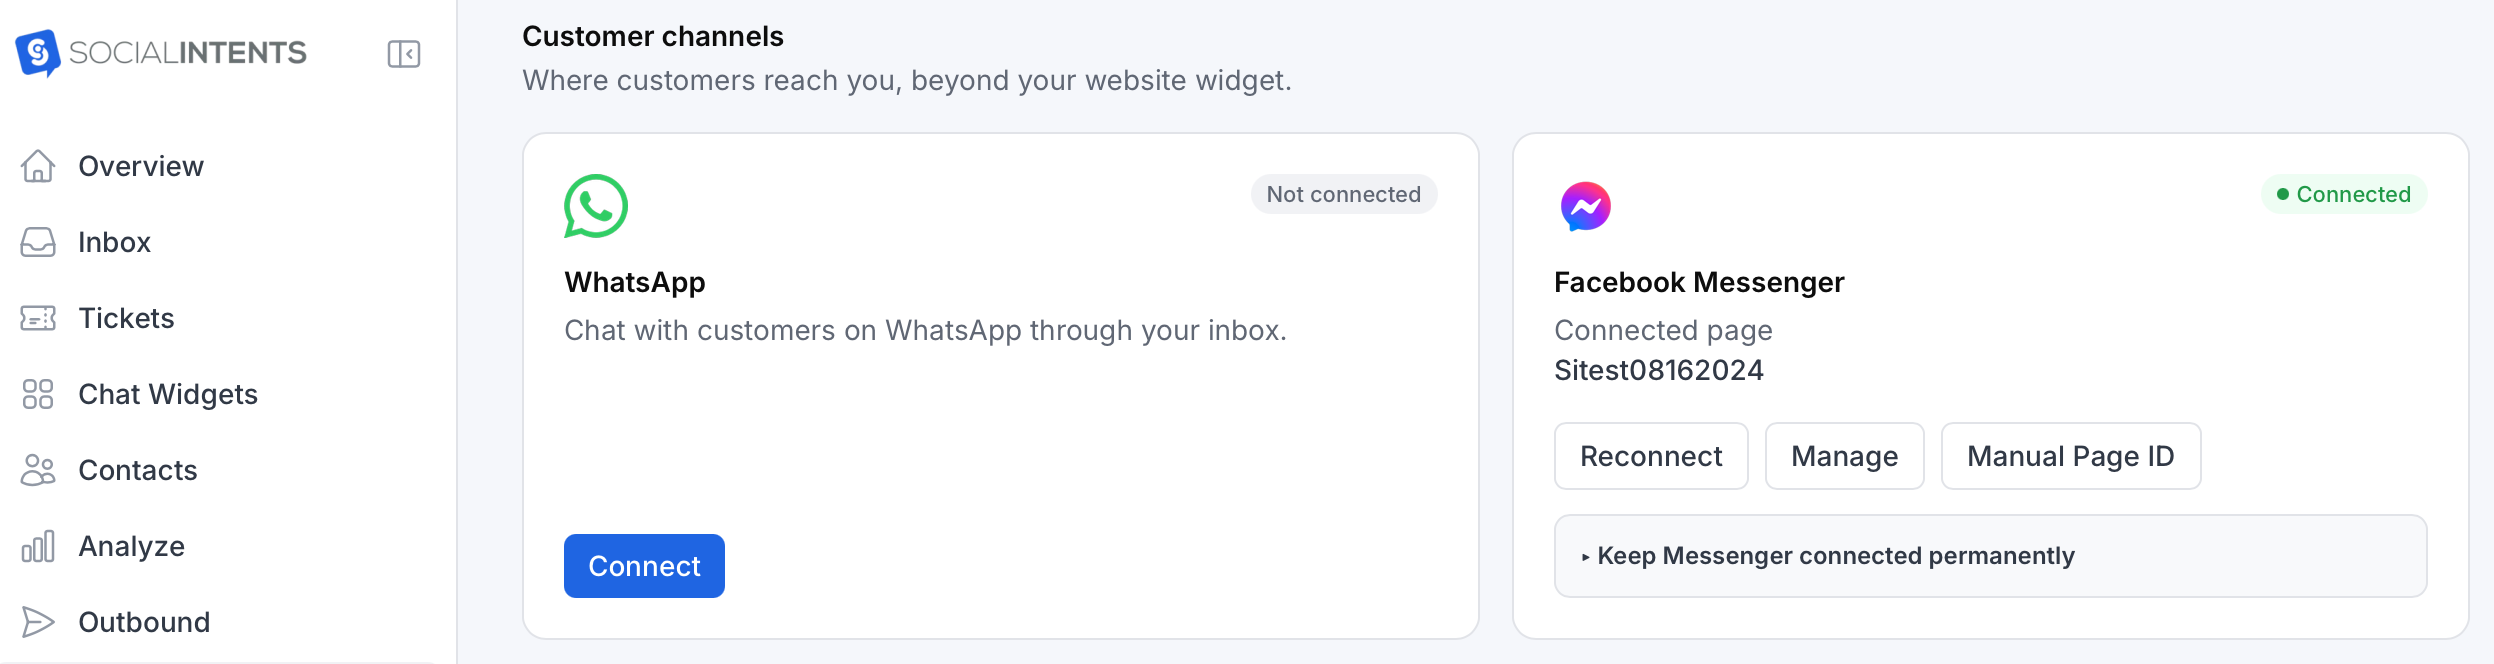
Several numbers can share a widget, or you can use separate widgets for different products and teams. Simply select which Chat Widget you want to route the inbound WhatsApp number to.

Related guide: Setting Up WhatsApp Business.
2. Verify your configuration and payment method
Before building the campaign, confirm that your number can receive messages and send replies.
- Review the Finish setup checklist, including display name and messaging status.
- Open WhatsApp Manager > Settings > Payment methods for the connected WhatsApp Business Account.
- Add or confirm a valid payment method.
- Send a message from your personal WhatsApp account to your business number.
- Confirm that the message appears in Social Intents and your connected team destination.
- Reply as an agent and verify that your reply reaches the phone.
If Social Intents reports Meta error 141006, Meta has reported a missing or invalid payment method. Resolve billing in WhatsApp Manager, then use Check again where shown in the broadcast composer.
Understand the costs: Your Social Intents subscription and Meta messaging charges are separate. Meta charges for delivered template messages based on category and recipient market. Check the current rates and service-message terms for your account, and budget for the replies as well as the initial broadcast. The broadcast's estimated Meta cost is not a forecast of the entire follow-up conversation.
See Meta's WhatsApp Business Platform pricing for the current published pricing information.
3. Configure your AI chatbot to qualify replies
Set up and test your chatbot before sending the broadcast. A reply such as “I'm interested” should lead to a useful conversation about the offer.
Enable the AI agent
- Go to Chat Widgets and select the widget assigned to your WhatsApp number.
- Open AI Agent > Agent settings.
- Enable the AI agent.
- Under When the AI responds, choose AI + human agents, AI drops when an agent answers for a workflow where AI participates and steps aside when your team replies.
- Choose your provider and model. Enter provider credentials if your selected model requires them.
- Set the bot's display name and an appropriate AI disclosure, then save.
If you select an offline-only response mode, the chatbot won't automatically handle every campaign reply while your team is online. Choose the mode that matches your campaign workflow.
Add product and campaign knowledge
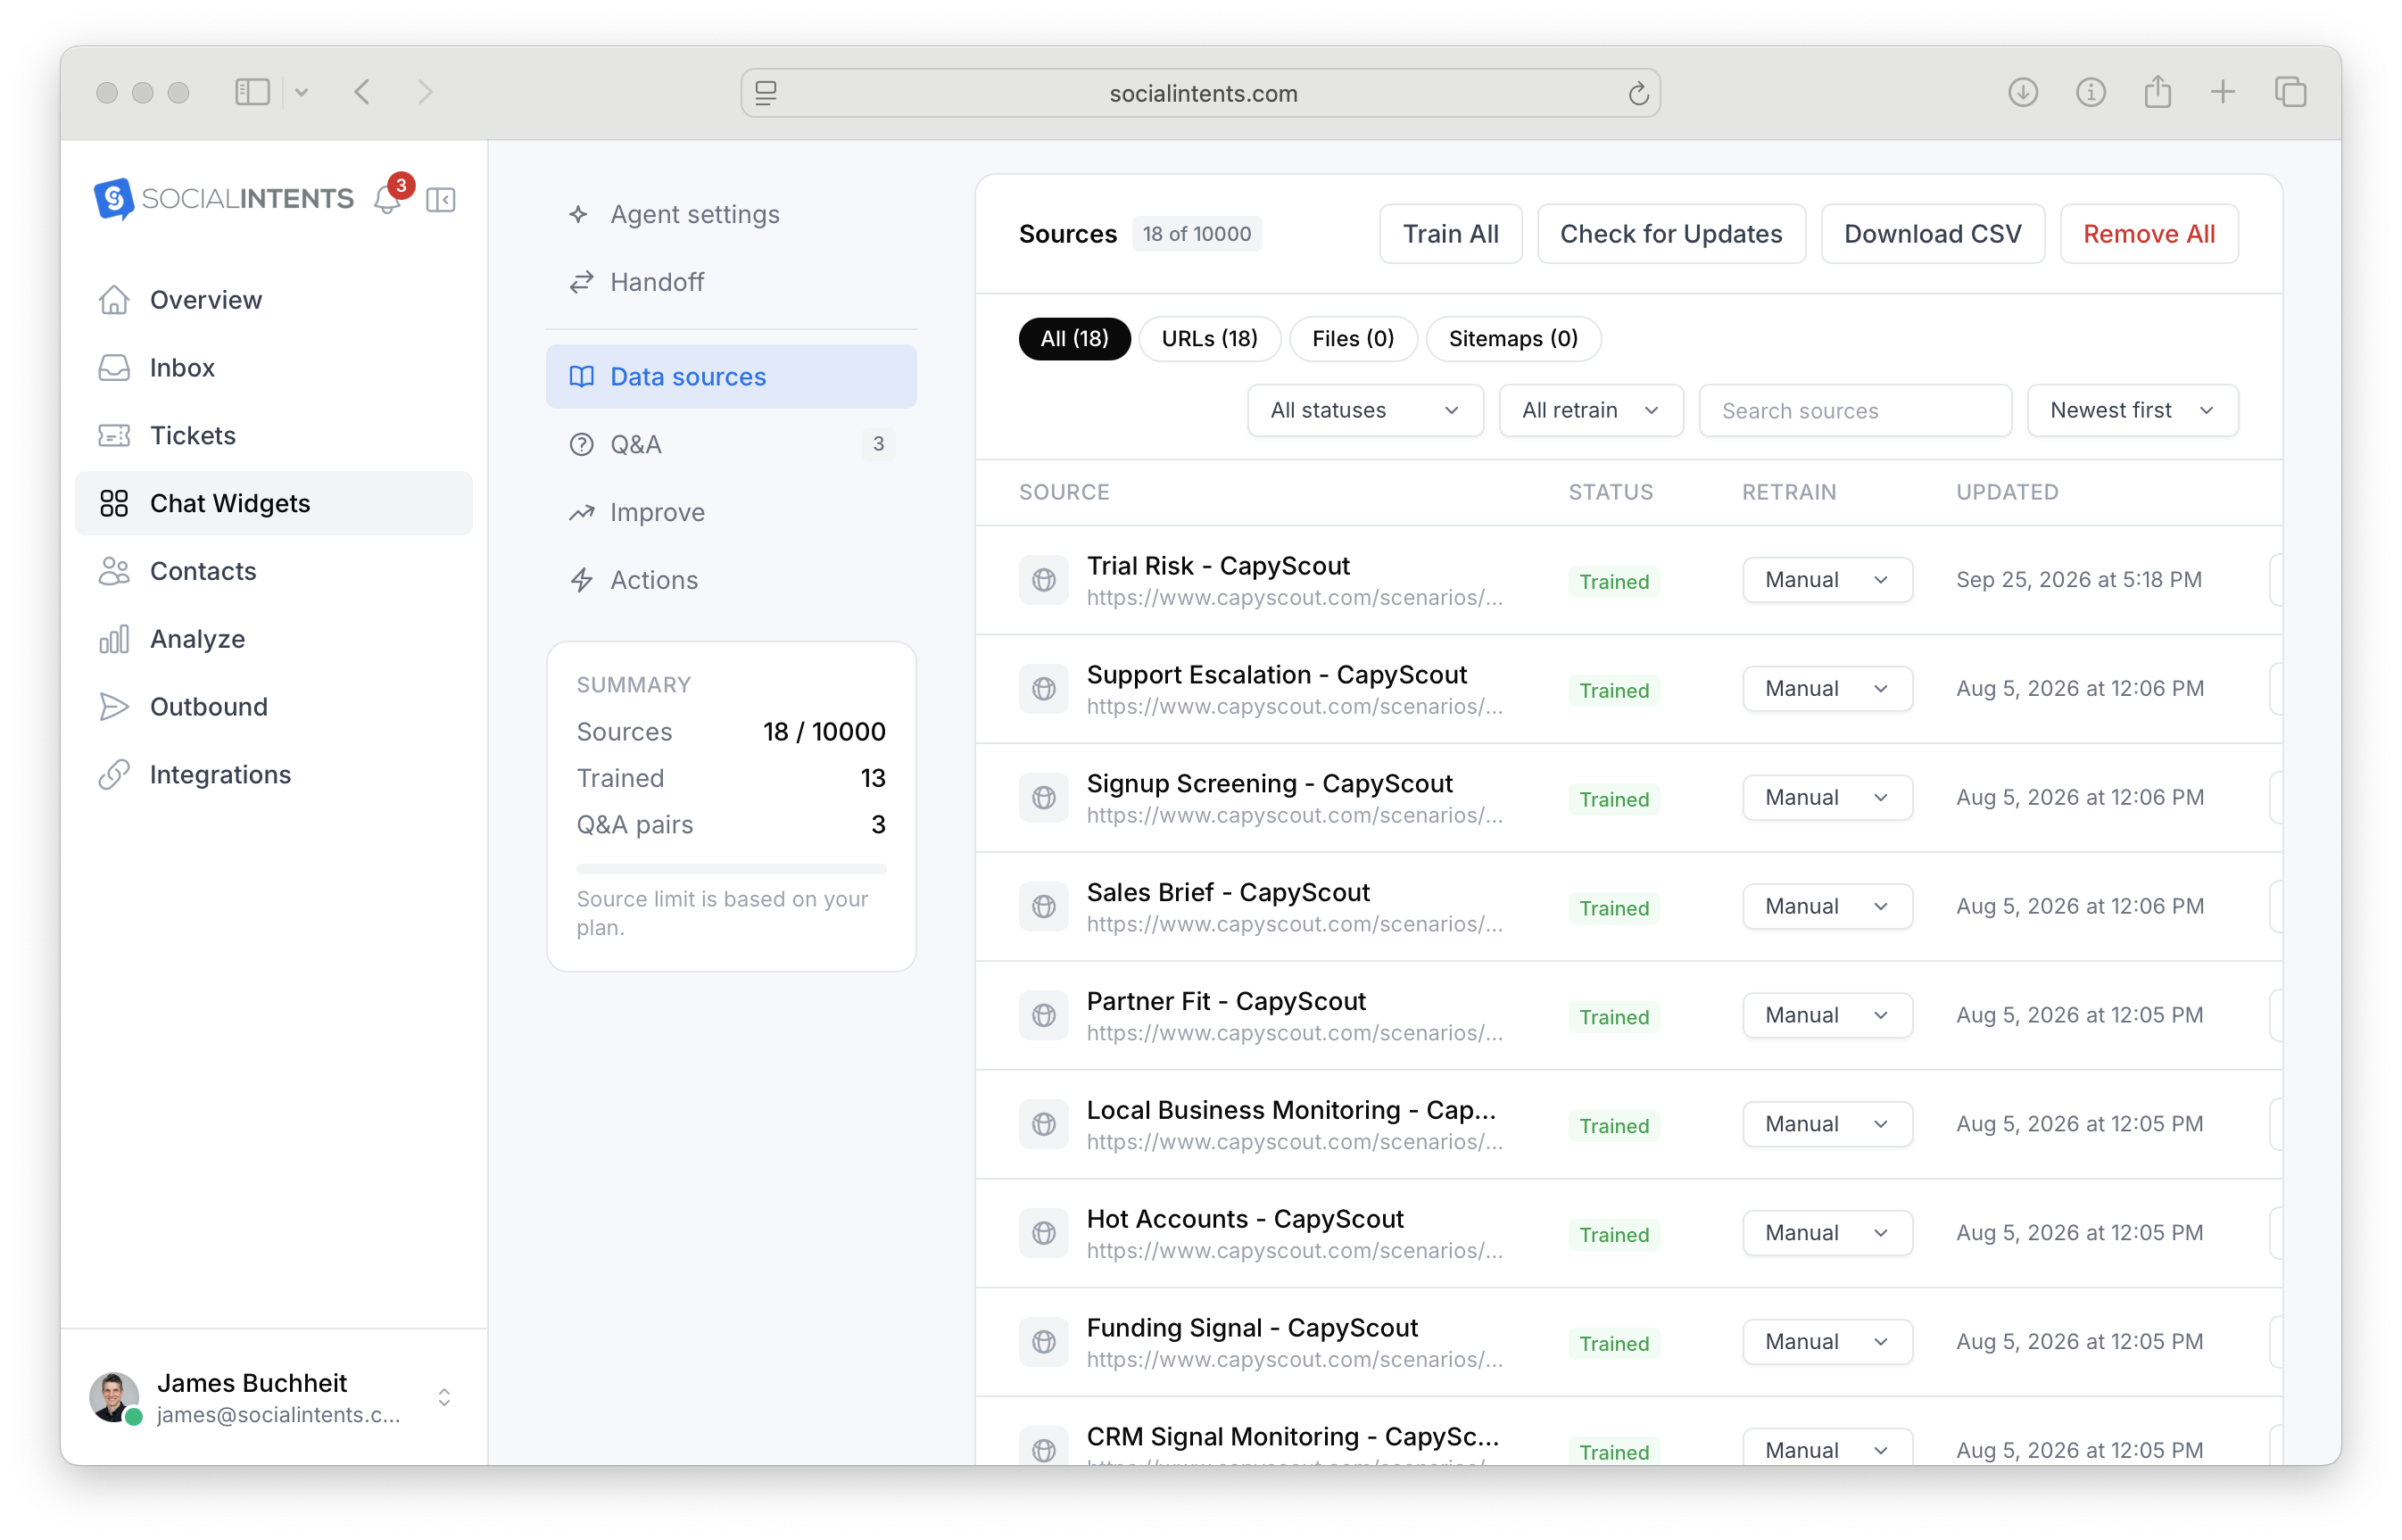
- In the AI Agent tab, open Data sources.
- Add relevant product pages, pricing pages, FAQs, or documents.
- Include the actual campaign offer, eligibility requirements, expiration date, and approved next steps.
- Click Train All for newly added web sources. Uploaded documents train automatically.
- Check the training status before testing.
Use Q&A for answers that must be precise, such as offer exclusions or a particular pricing question. Retrain changed sources before launching a revised campaign.
Write qualification instructions
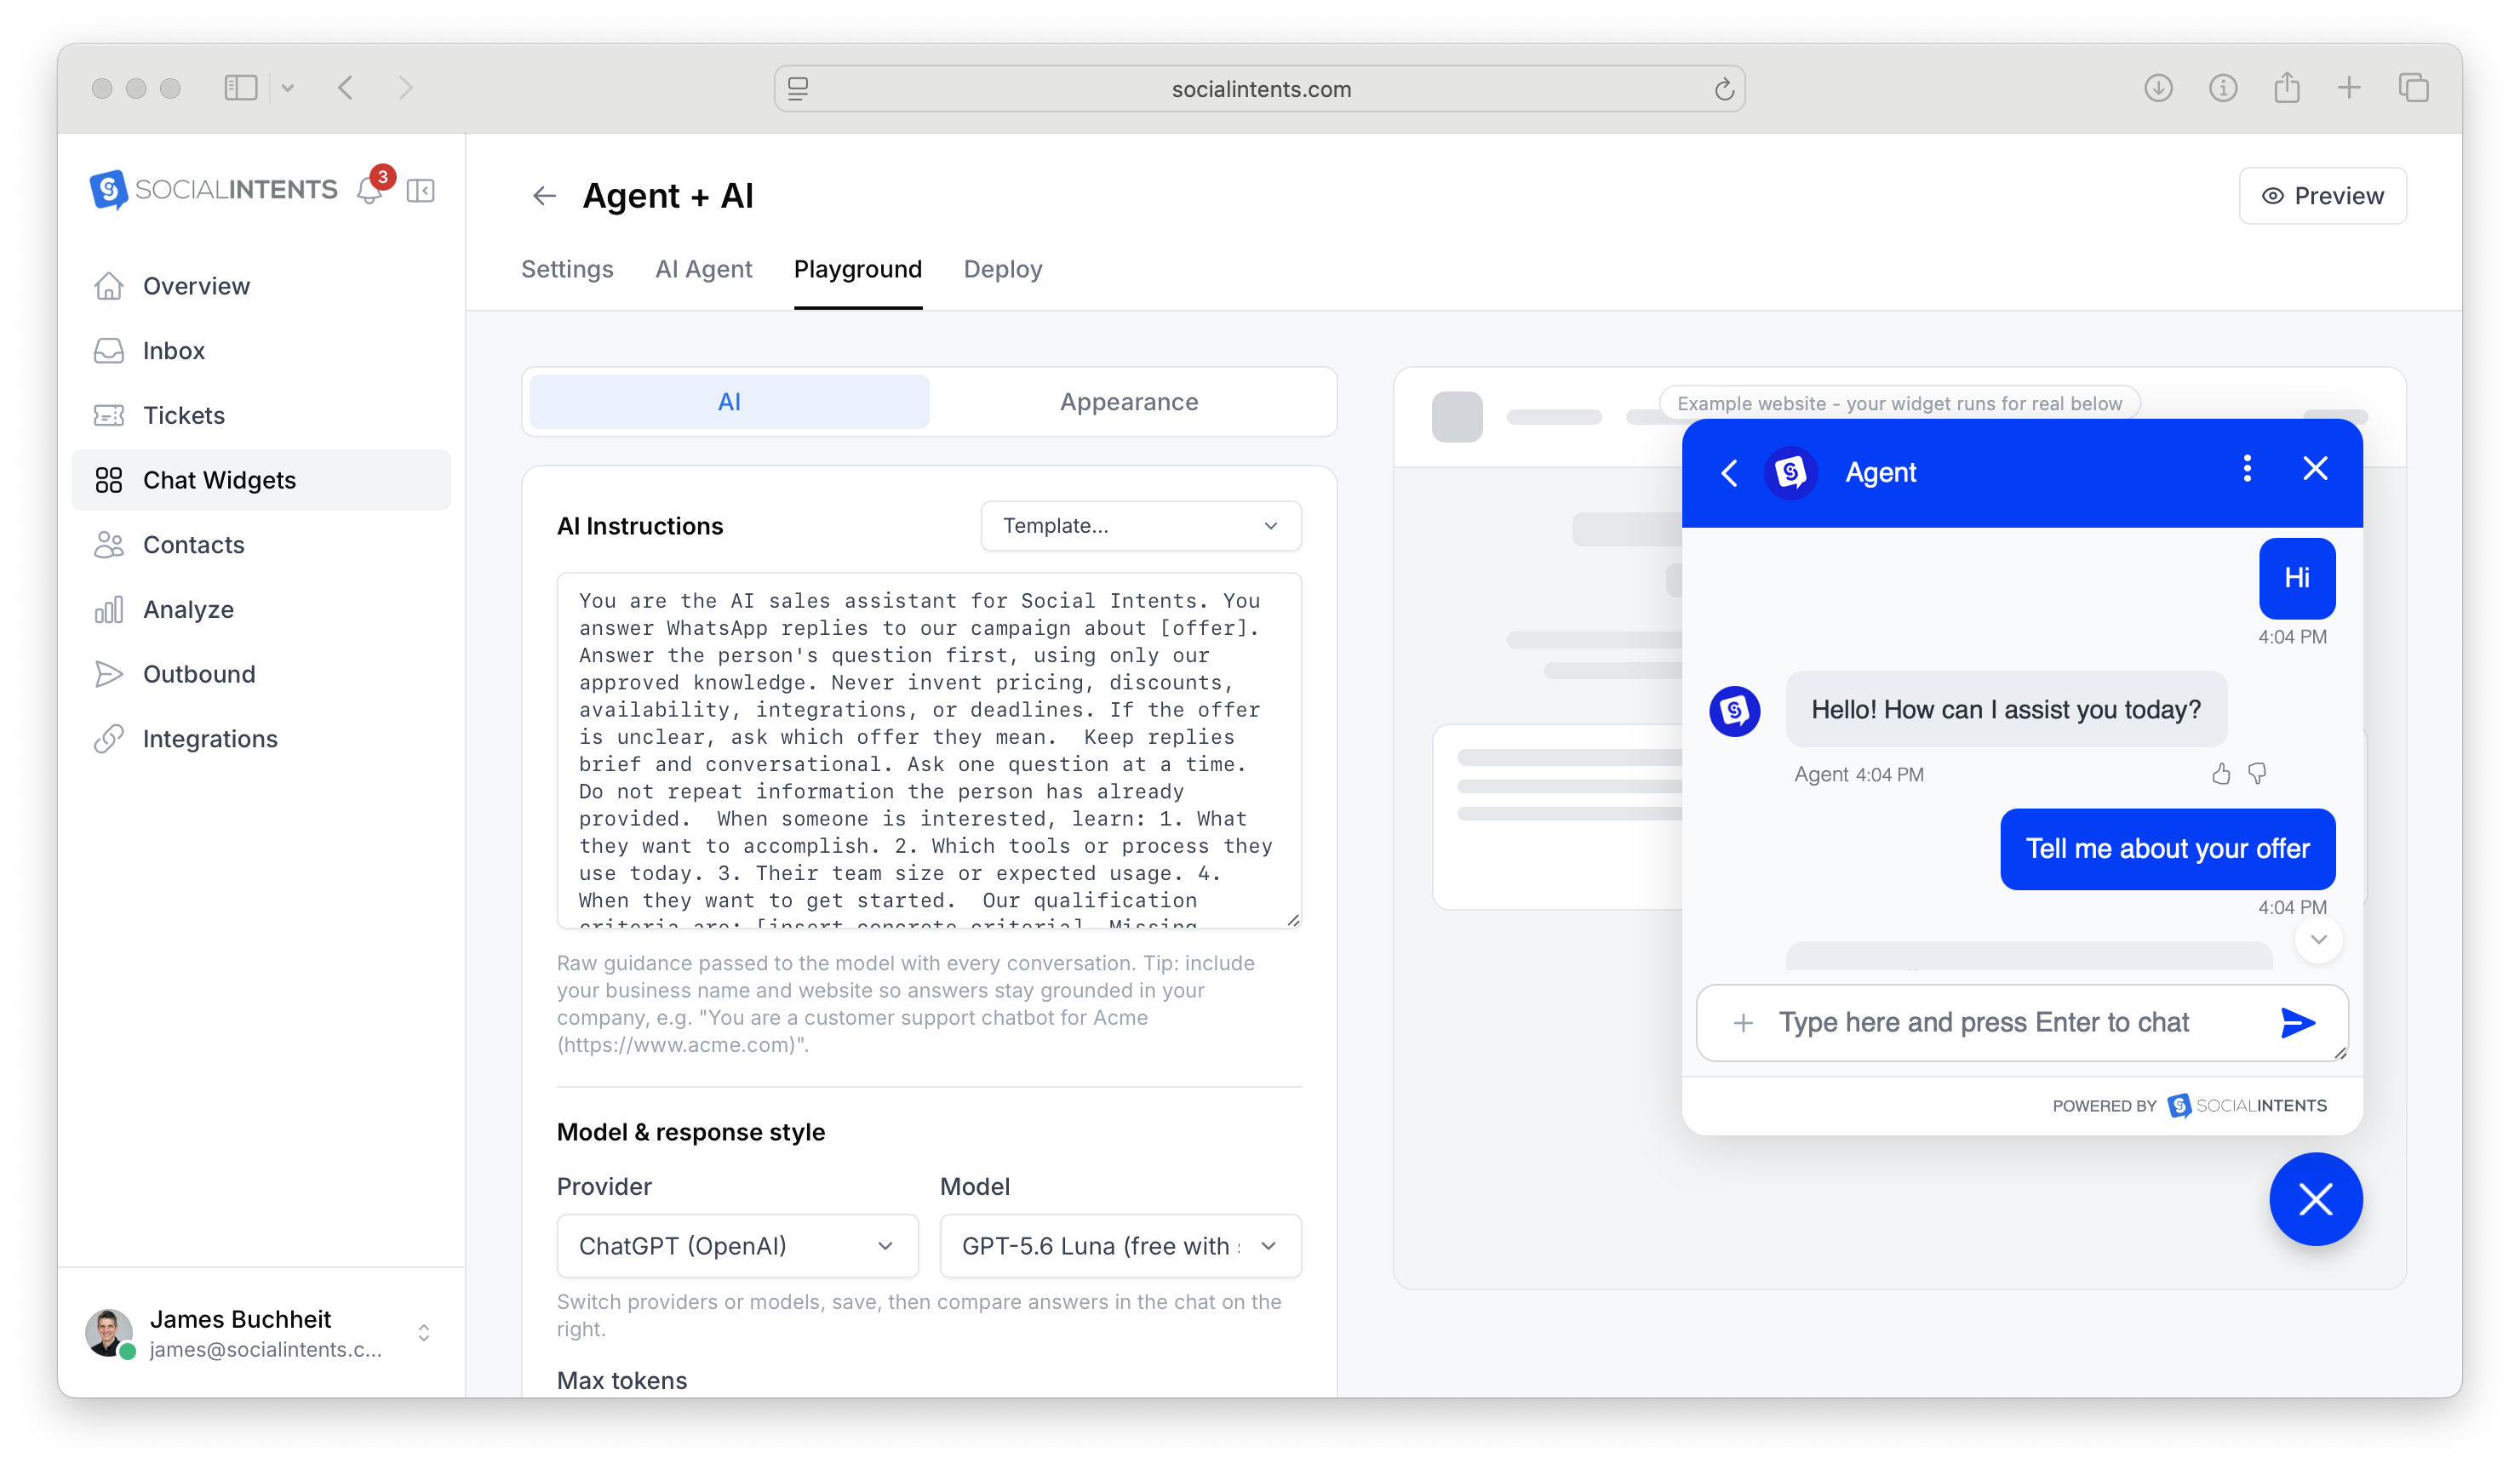
Open the widget's Playground tab and edit AI Instructions. You can start with the Lead qualificationtemplate or adapt the example below.
This example is for a software business. Replace the bracketed text with your actual offer and qualification rules before saving.
You are the AI sales assistant for [Company]. You answer WhatsApp replies to our campaign about [offer]. Answer the person's question first, using only our approved knowledge. Never invent pricing, discounts, availability, integrations, or deadlines. If the offer is unclear, ask which offer they mean. Keep replies brief and conversational. Ask one question at a time. Do not repeat information the person has already provided. When someone is interested, learn: 1. What they want to accomplish. 2. Which tools or process they use today. 3. Their team size or expected usage. 4. When they want to get started. Our qualification criteria are: [insert concrete criteria]. Missing information is unknown, not automatically a reason to reject a lead. When the person meets those criteria and wants a next step, offer to connect them with sales. Use the configured Route_Qualified_Lead action when its conditions are met. If that action is unavailable, do not claim that routing happened; offer the configured human handoff. If someone explicitly asks for a human, help them reach one immediately without requiring them to finish qualification. If nobody is available, explain that the team will follow up and ask for their preferred contact details. If someone opts out, stop the sales conversation. Do not persuade them to stay subscribed. Do not claim to have changed their subscription unless the system confirms it. Only claim that a meeting was booked, a lead was saved, or a handoff succeeded when the corresponding configured action succeeds.
Click Save & restart chat, then test questions such as “What does this cost?”, “Will it work with our tools?”, “I'd like a demo”, and “Can I talk to a person?”
Instructions guide the conversation. Actions perform operations. Asking the chatbot to save a lead or route a conversation does not configure a CRM integration or routing destination. Set up the required action separately.
Configure human handoff
- Open AI Agent > Handoff.
- Add specific Trigger phrases, such as “talk to a human” and “speak to sales”.
- Set an Escalation response that accurately describes what happens next.
- Configure When the AI has no answer so unresolved questions have a clear path to your team.
- Save your changes.
For example: “I'll pass this to our team. If someone isn't available now, we'll follow up when we're back online.” Avoid promising an immediate response unless your team can provide one.
Automatically route qualified leads to sales
For routing based on qualification or buying intent, configure an Escalate Chat to Human AI Action. Custom Actions are available on Pro and Business plans and during the free trial.
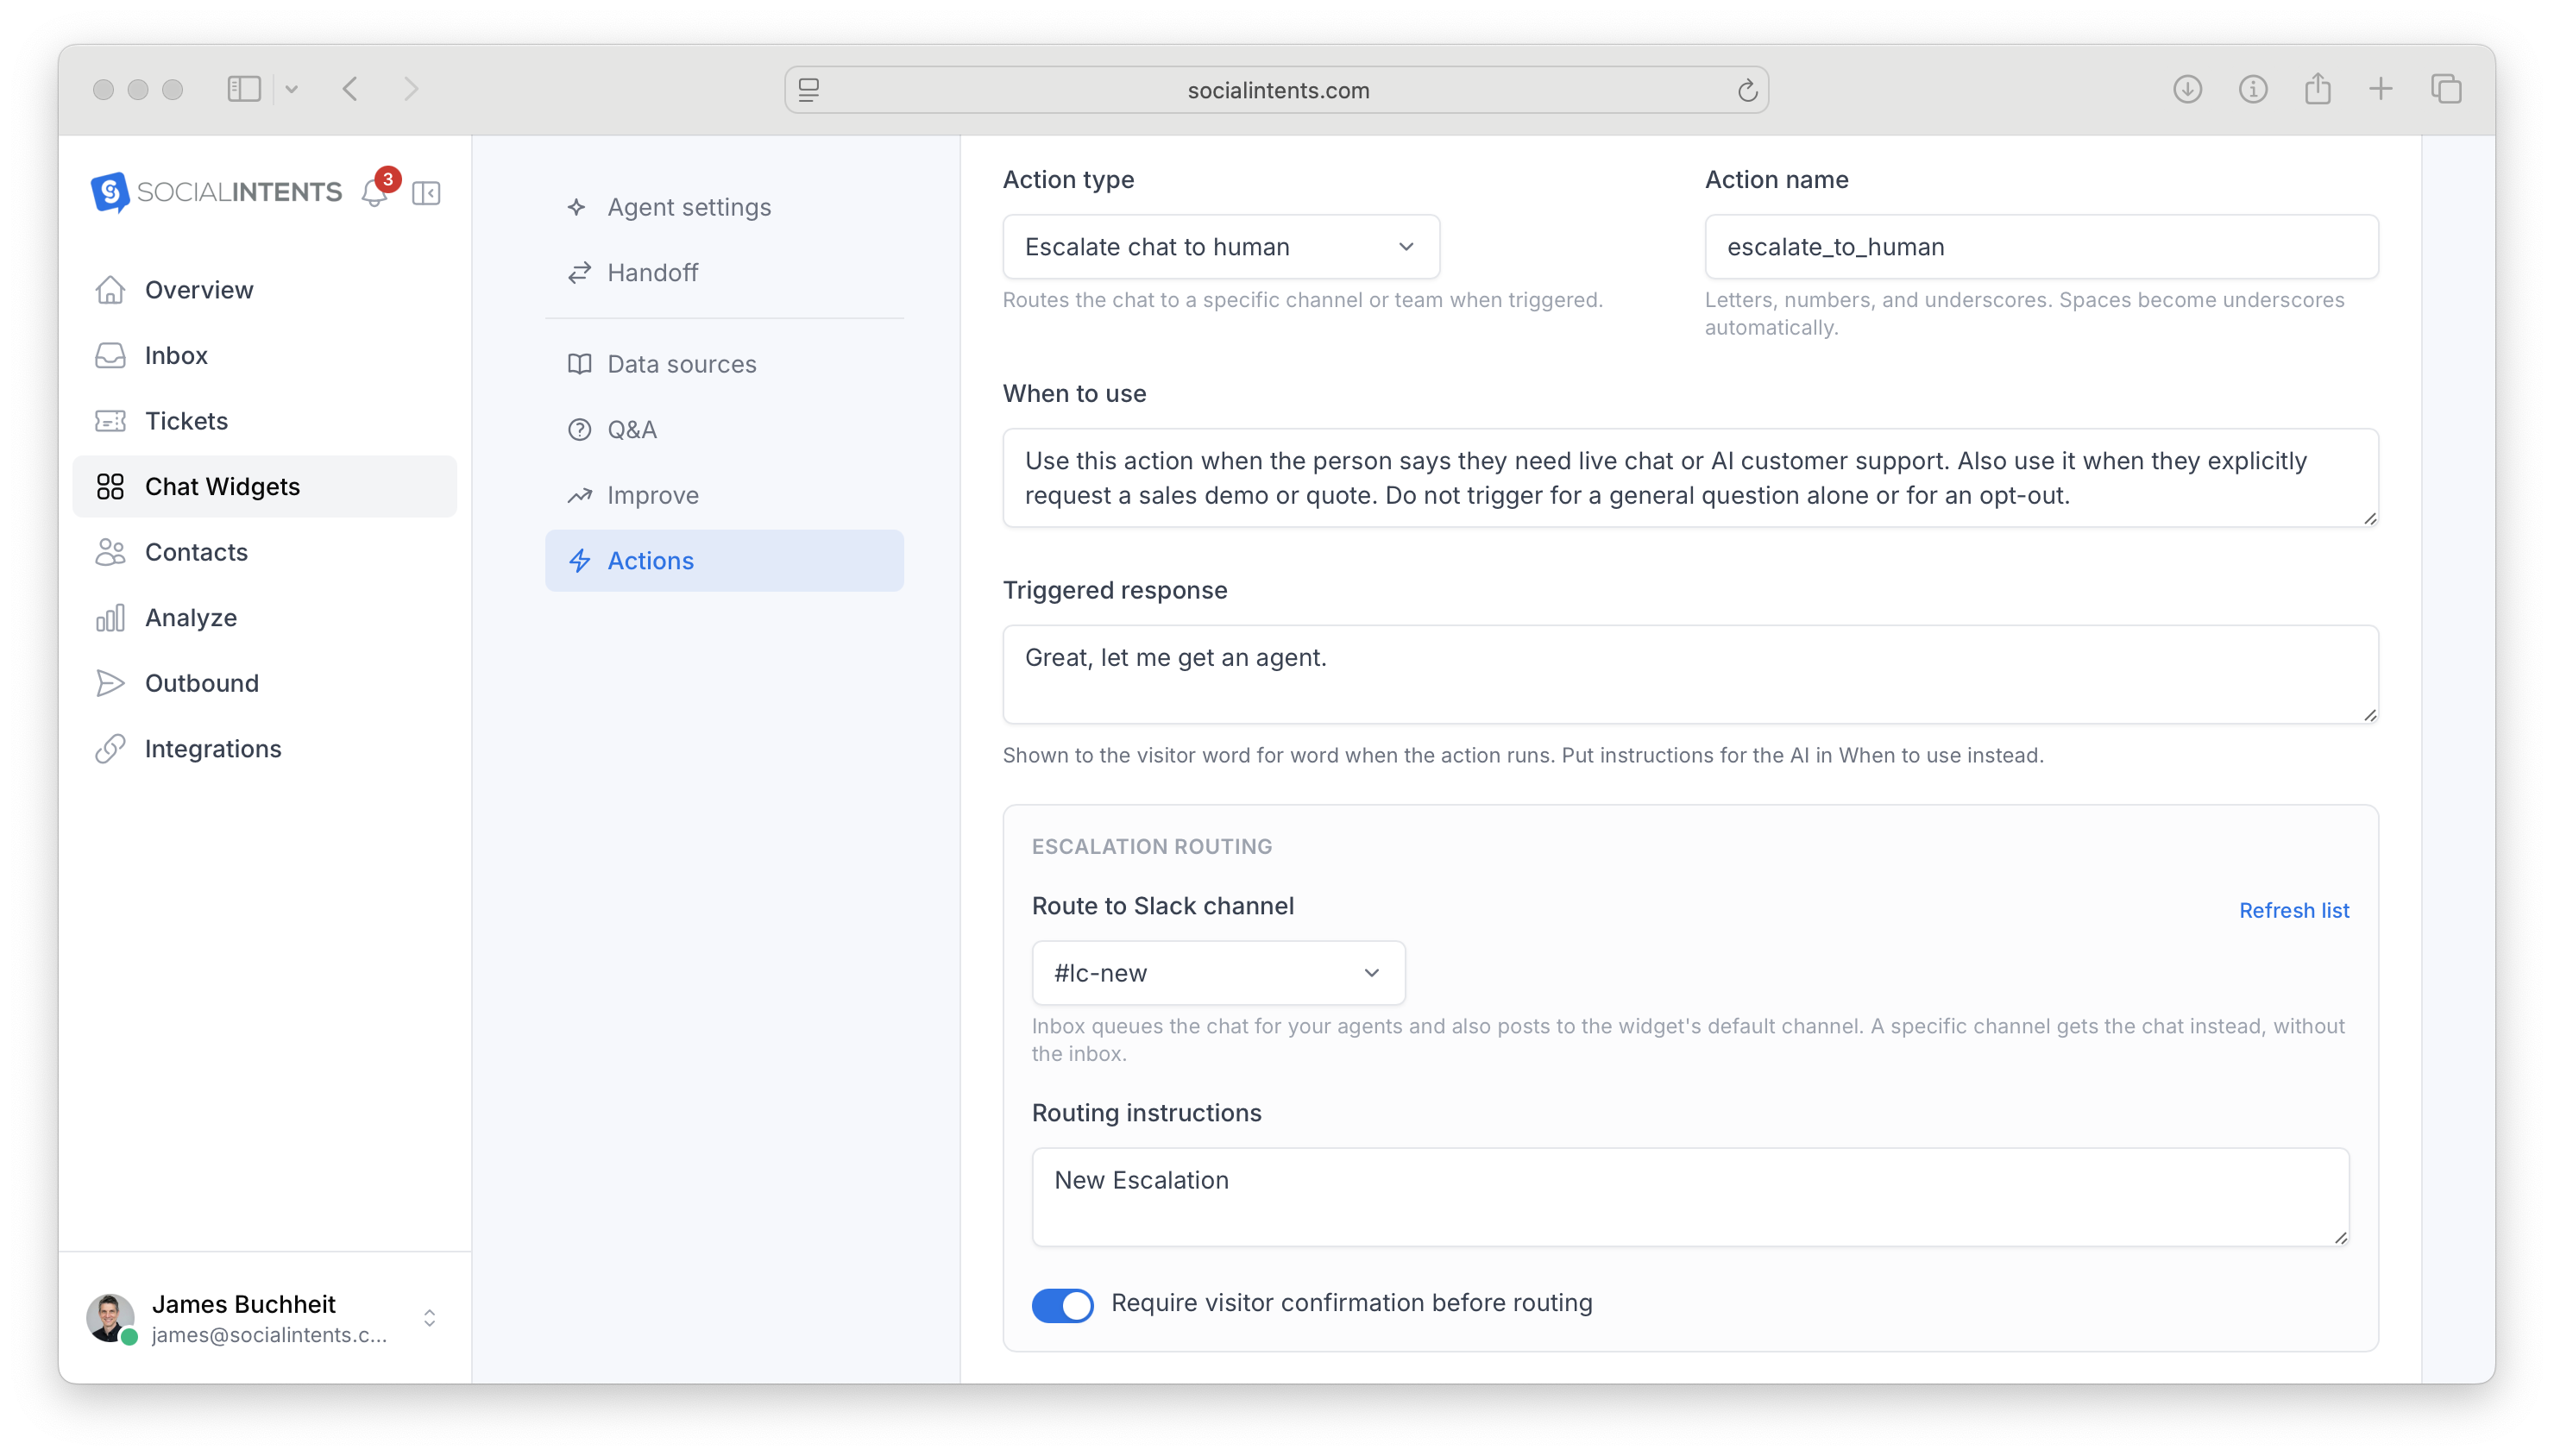
- Open AI Agent > Actions > New action.
- Select Escalate Chat to Human as the action type.
- Name it Route_Qualified_Lead.
- In When to use, describe your exact qualification and purchase-intent conditions.
- Select the sales destination under Escalation routing. Make sure Social Intents has access to that channel or space.
- Add a Triggered response and Routing instructions for the receiving team.
- Enable Trigger only once per session to avoid repeated routing, then save.
Example When to use:
Use this action when the person says they need live chat or AI customer support, uses Microsoft Teams, Slack, or Google Chat, and wants to evaluate a solution within 30 days. Also use it when they explicitly request a sales demo or quote. Do not trigger for a general question alone or for an opt-out.
Example Routing instructions:
This contact is responding to our WhatsApp campaign and has shown buying intent. Review the conversation for their use case, current tools, team size, and timeline before responding.
Use the same qualification criteria in the action and chatbot instructions. Without a custom routing action, use standard handoff to the widget's default team destination.
Related guides: Build Your First AI Chatbot and Escalation Routing.
4. Create your outbound WhatsApp Marketing template
Use an approved Marketing template for promotions, offers, announcements, and re-engagement. Template approval applies to the outbound message. The chatbot handles the conversation after the recipient replies.
- Open Outbound > Templates.
- Click New template, or select Browse library and choose a starting template.
- Enter a name using lowercase letters, numbers, and underscores, such as ai_support_demo_invitation.
- Select Marketing and the message language.
- Write your message and add personalization using + Variable.
- Add realistic sample values for Meta's review.
- Add a quick reply if appropriate and use + Add a "Stop promotions" button to provide an easy opt-out.
- Review the phone preview, then click Submit for review.
Example message for contacts who opted in to hear from your business:
Hi {{1}}, it's the team at [Your Company]. Want to see how AI could answer customer questions and pass interested buyers to your team? Reply YES and we'll help you explore whether it's a fit.
Reply STOP to opt out.
Replace the business name before submission. Use the editor's variable control for the first-name placeholder and supply a realistic example. If you include a link or phone number, use your real business details.
Wait until the template status is Approved. If you created it directly in Meta, click Sync from Meta. If it is rejected, open the rejection details and use Edit & resubmit.
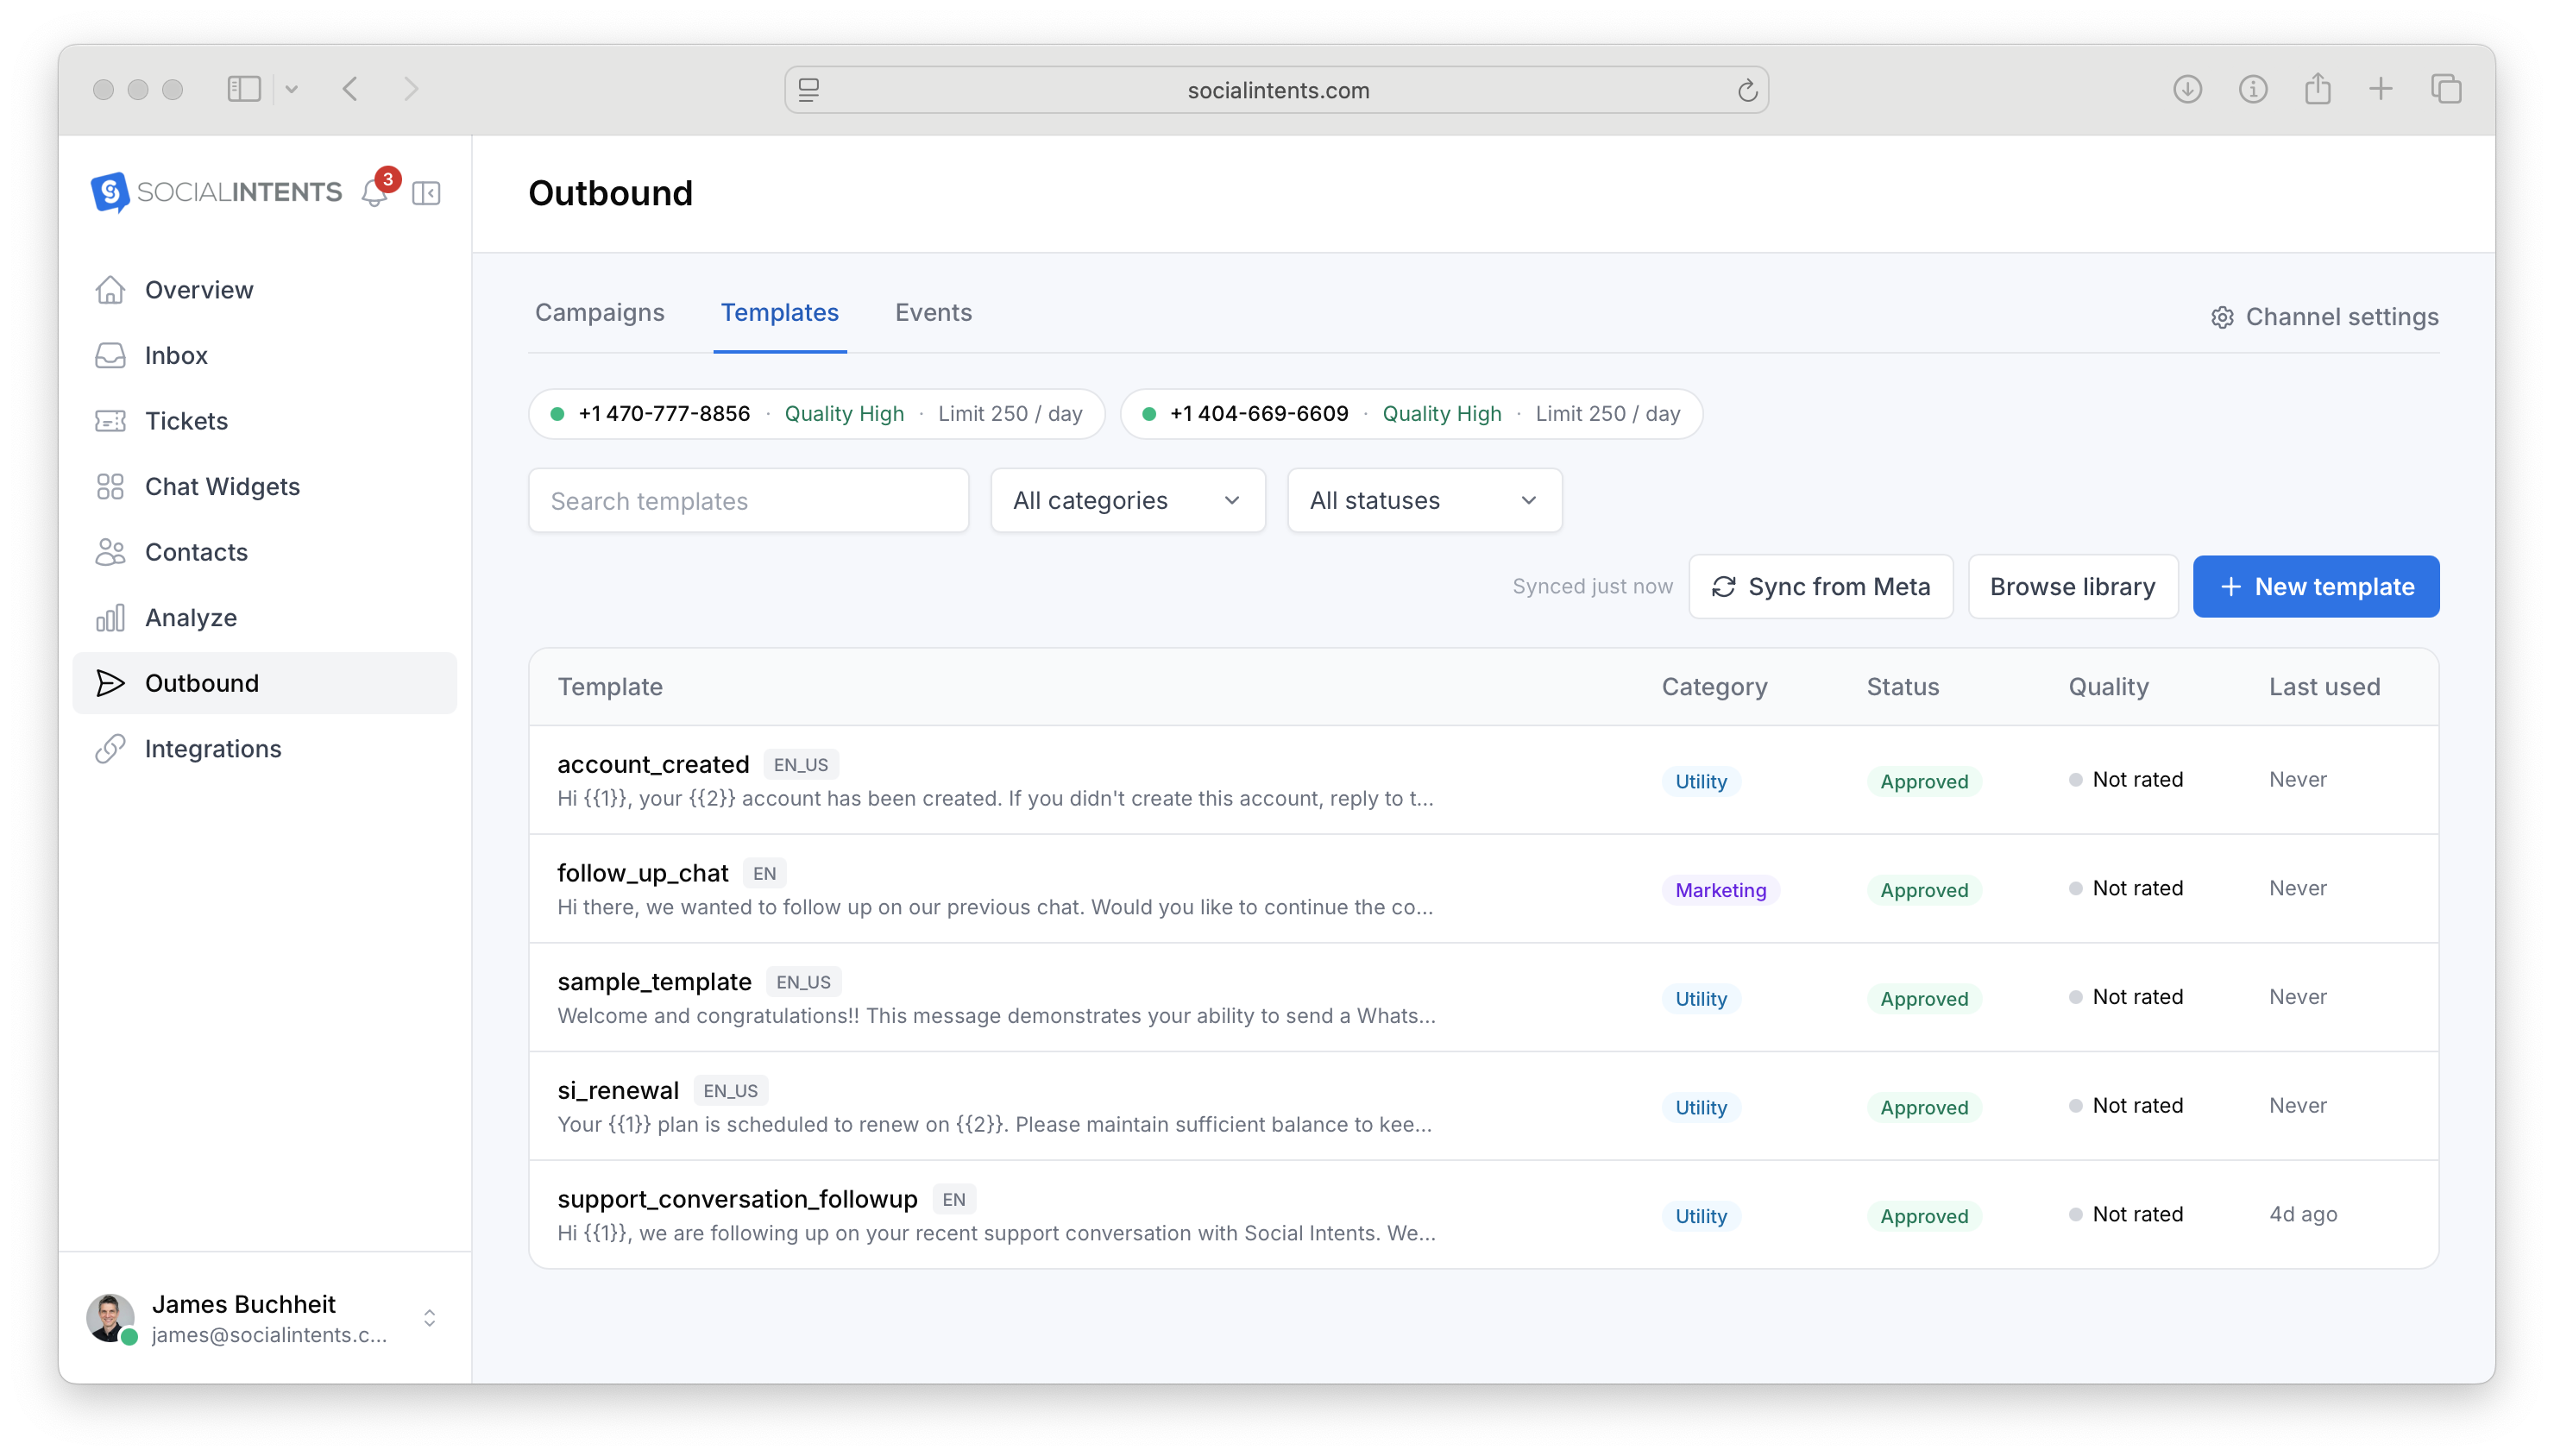
Related guide: WhatsApp Template Manager and Library.
5. Add contacts and create your audience
For a first campaign, use a clearly defined list of opted-in contacts. Having a customer's phone number does not by itself mean they agreed to WhatsApp marketing.
Import a contact list
- Go to Contacts > Import.
- Upload or paste your CSV. Supported fields include First Name, Last Name, Email, Phone, Company, City, Country, Tags, and WhatsApp Consent.
- Review the field mapping. Prefer phone numbers with their international country code; choose a default country when needed.
- Use Tag everyone if you want a campaign tag, and select Create a list to make this import available as an audience.
- Under WhatsApp consent, choose the option that accurately reflects the contacts' consent or map the consent column.
- When recording opt-ins, complete How did they opt in? with the actual source of permission.
- Finish the import and review the contacts.
For a list containing different consent statuses, map the status per contact rather than marking everyone opted in. Never import a purchased list as opted-in WhatsApp contacts.
If you already have contacts in Social Intents, review their phone numbers and consent records before including them in the campaign.
Choose a list, smart audience, or segment
Open Contacts > Audiences. Use a fixed list for a specific campaign group, a smart audience such as Opted in to WhatsApp marketing, or a segment that combines rules such as consent, tag, phone country, and prior broadcast engagement.
A segment evaluates its rules when you send. Review the final Reach count because the eligible audience can change between drafting and delivery.
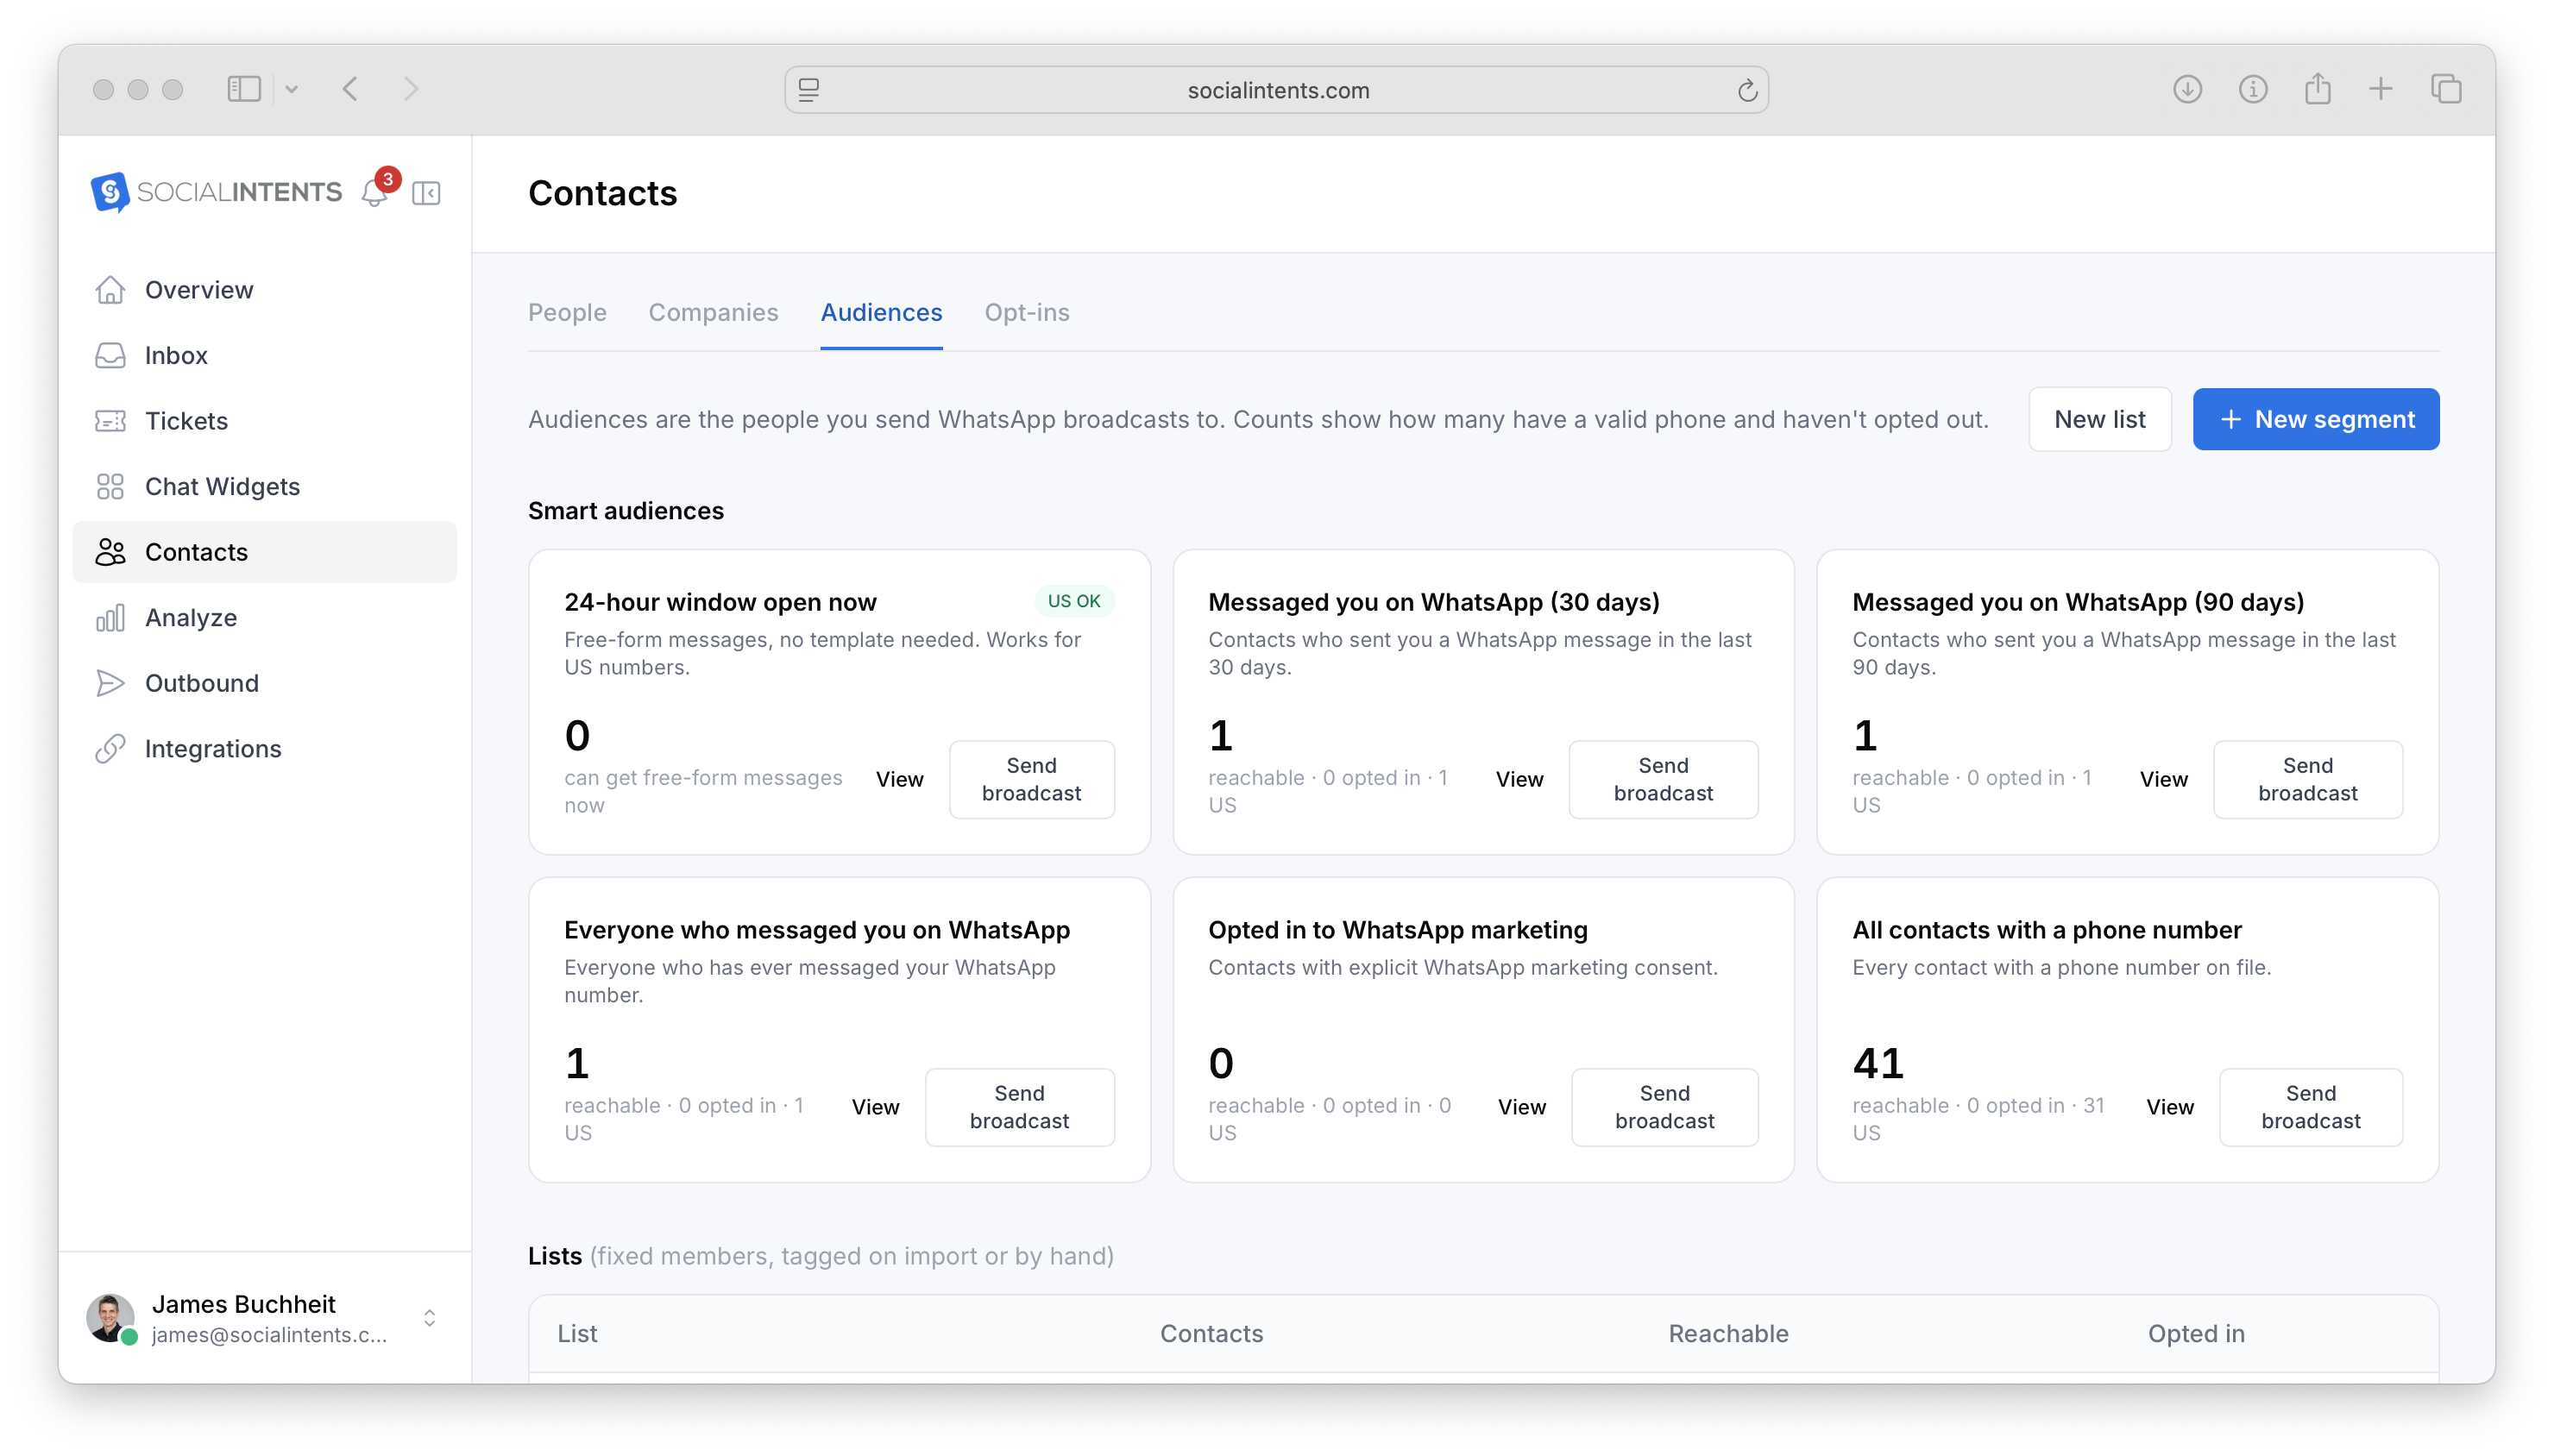
Related guide: Audiences, Lists and Segments.
6. Create, test, and schedule your broadcast
- Go to Outbound > Campaigns.
- Click New campaign and choose WhatsApp broadcast.
- Give the campaign a descriptive internal name.
Select the audience and sending number
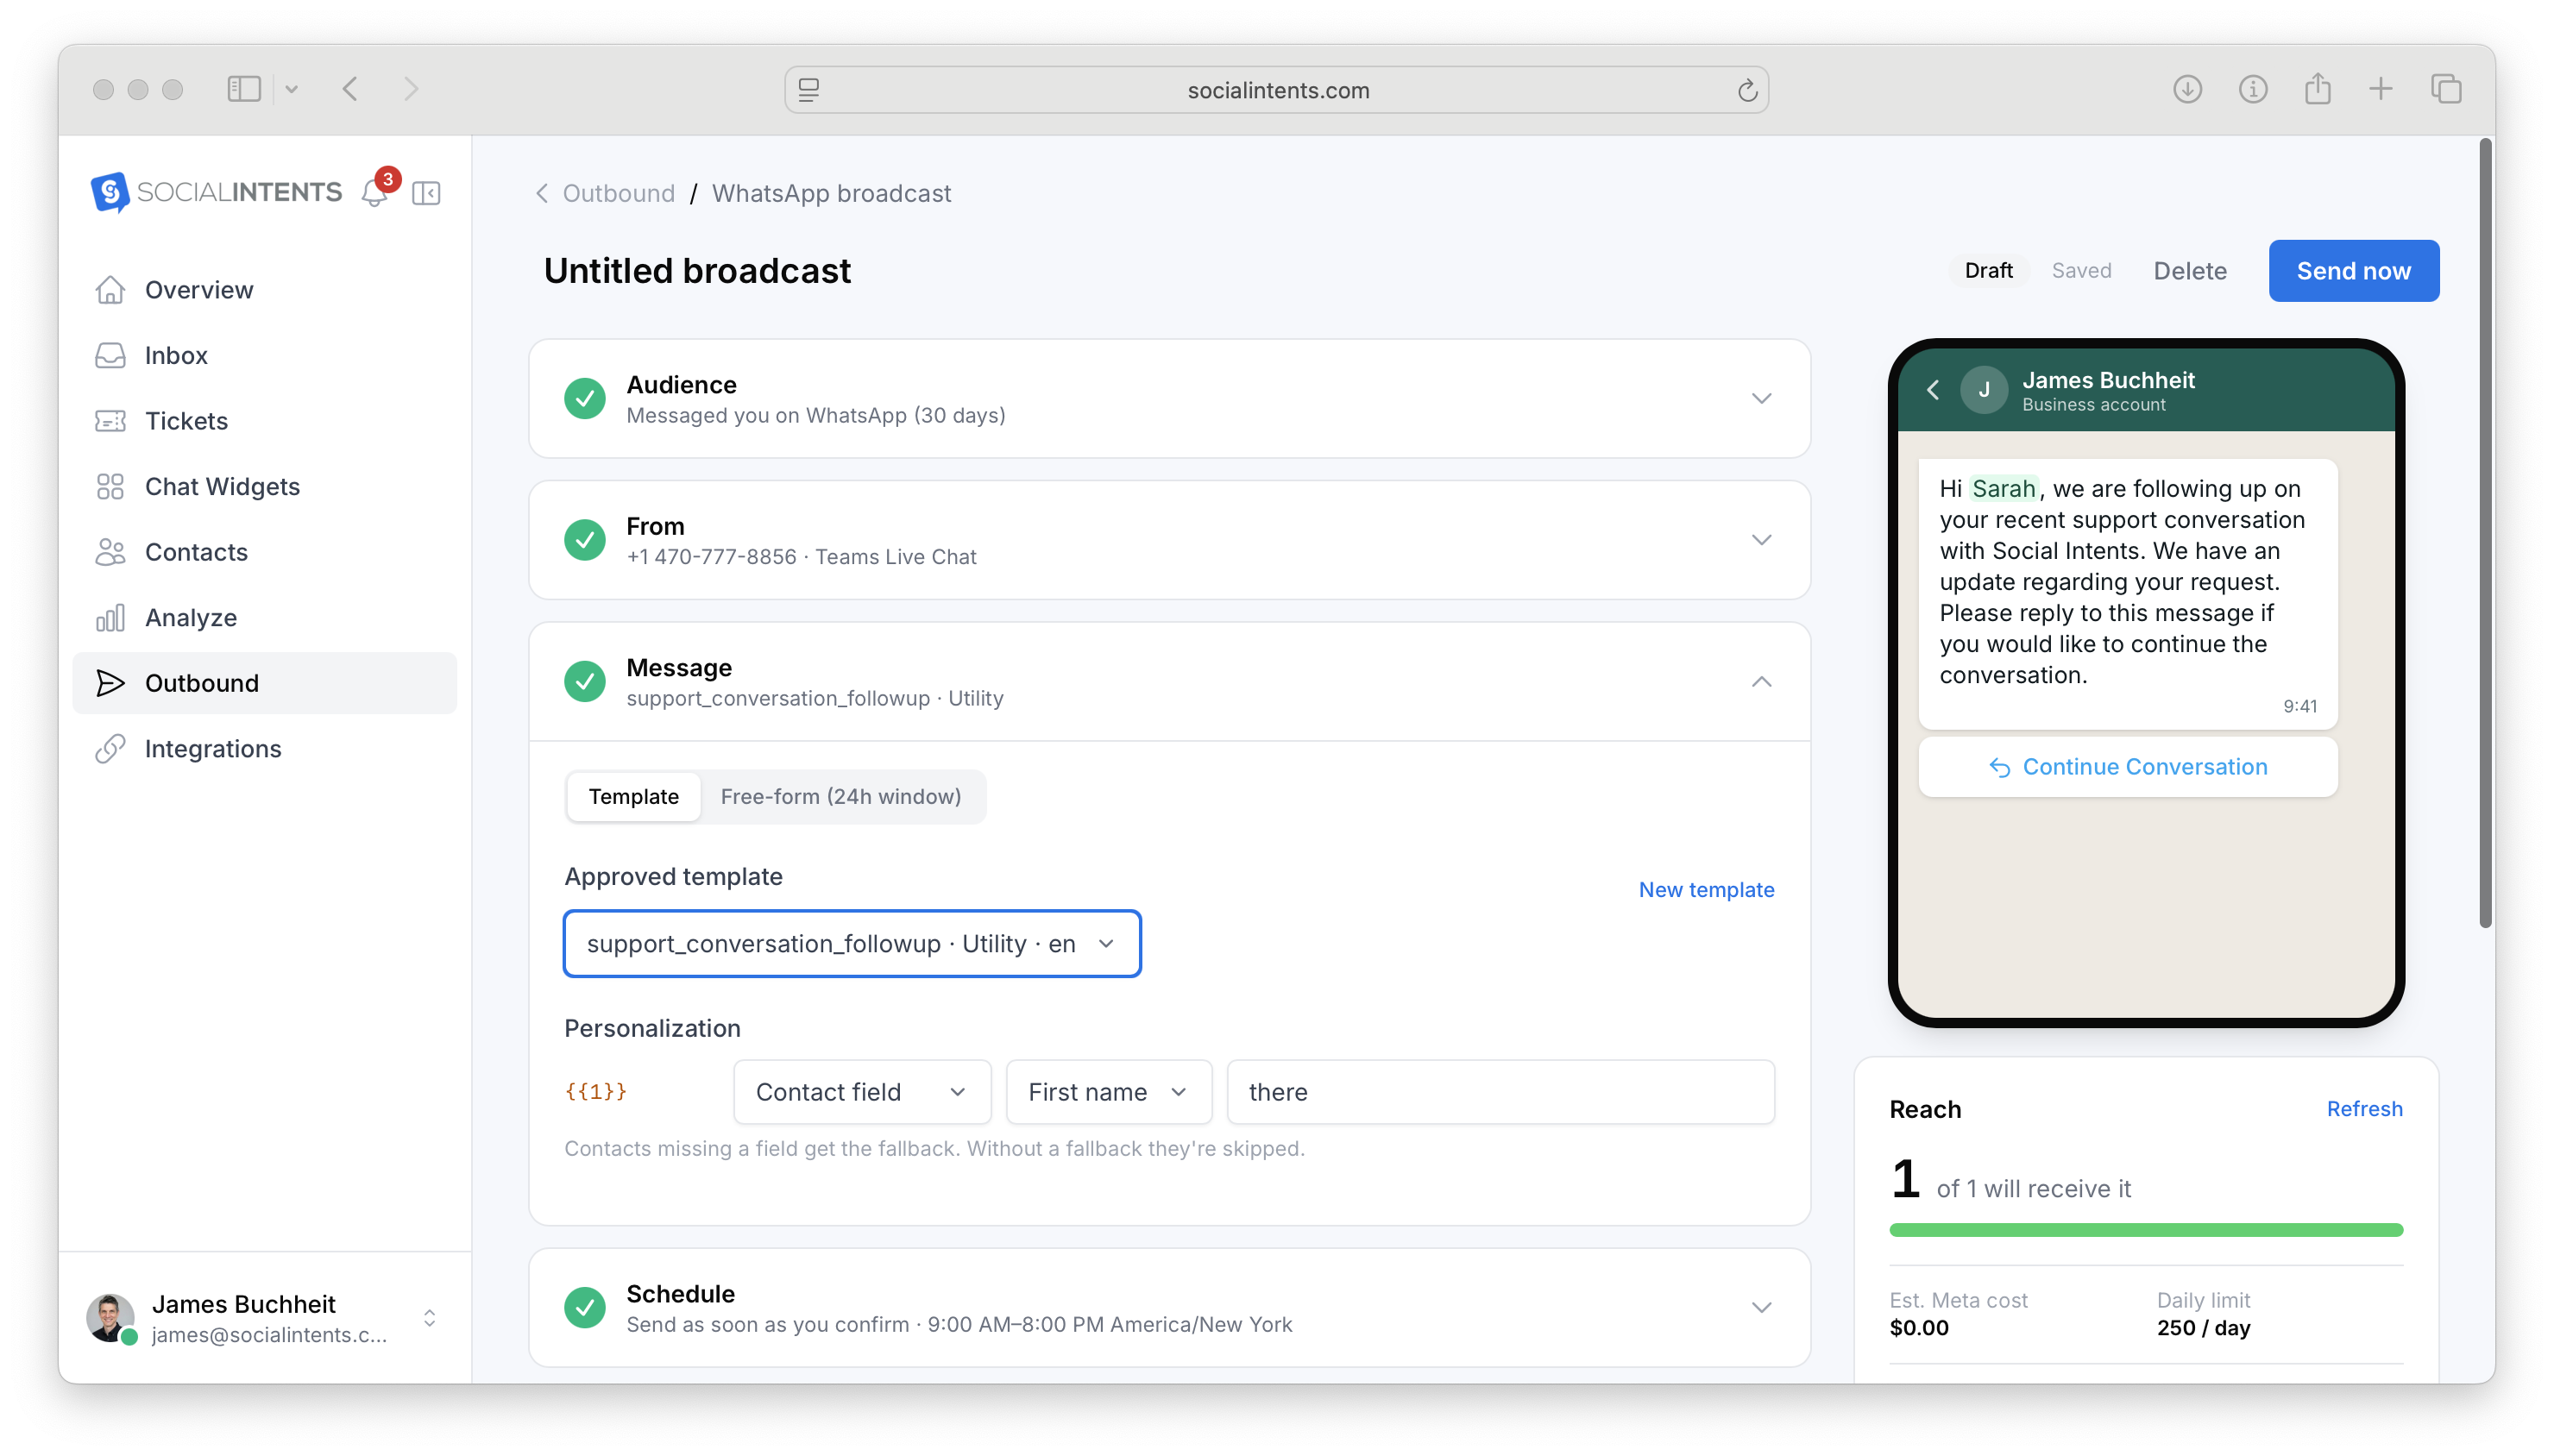
In Audience, select your list, smart audience, or segment. In From, choose the sending number. Confirm that this number routes to the widget whose chatbot you configured.
Select and personalize the message
In Message, choose Template and select the approved template. Under Personalization, map each variable to a contact field or select a value that is the same for everyone.
For the first-name variable, map it to the contact's first name and use a fallback such as “there”. A missing required value without a fallback can cause a contact to be skipped. If your template uses an image, video, or document header, select the campaign's actual media file.
When can you use Free-form (24h window)? Only when the recipient has messaged your business within the preceding 24 hours. Sending a broadcast does not itself open that window. For the outbound marketing workflow in this guide, use the approved template.
Set timing and delivery controls
- Schedule: Choose Send now or Schedule for later, and confirm the time zone.
- Send window: Keep it enabled and choose suitable hours. The default is 9:00 AM to 8:00 PM. Select business time zone or recipient-local timing as appropriate.
- Frequency guard: Keep a suitable gap between marketing broadcasts. The default guard is 24 hours.
- Skip contacts in an open conversation: Keep this enabled if you don't want the campaign to interrupt an active chat.
- Send speed: Choose a pace your team can support. Gentle delivery is useful when a small team needs to handle escalations.
Contacts outside the send window wait in the queue. A scheduled time earlier than the window opening does not override quiet hours. For free-form sends, the recipient's 24-hour eligibility can expire while the message waits.
Review Reach and test the complete journey
The Reach panel shows eligible recipients, exclusions, estimated Meta cost, and applicable allowances. Review skip reasons such as missing consent, opt-outs, US marketing restrictions, missing personalization, or an active conversation.
- Use Send a test to preview the message on an eligible WhatsApp number you control.
- Check the business identity, message, variable values, media, and buttons.
- Reply with a normal campaign response, such as “Yes, I'd like to know more.”
- Confirm that the correct AI chatbot responds.
- Test qualification and request a human. Verify that the conversation reaches your team and an agent can reply.
- Use a separate test contact to check the opt-out behavior.
If your own number cannot receive Marketing templates because of a regional restriction, use another eligible test number you control. Don't change the template category to force delivery.
Test sends aren't included in campaign reports. To verify reporting and campaign reply attribution, send a small live pilot to opted-in test contacts before launching to the full audience.
Send or schedule
Click Send now or Schedule, review the final recipient count and cost estimate, and confirm the required consent declaration.
Your account's first broadcast to more than 500 recipients requires a review, usually within one business day. Allow for this when planning a launch. Check the composer for your current monthly allowance, per-broadcast maximum, and Meta messaging limit.
Related guides: WhatsApp Broadcasts and Sending Limits and Quiet Hours.
7. Manage replies with AI and hand qualified leads to your team
When a recipient replies, their message opens or refreshes WhatsApp's 24-hour customer service window. Social Intents routes the reply to the sending number's widget, where your AI settings and handoff rules apply.
The following is an illustrative conversation, not a guaranteed script:
Customer: Yes, I'd like to see how this works.
AI: Happy to help. Are you looking to answer support questions, qualify sales inquiries, or both?
Customer: Both. We miss inquiries after hours.
AI: Which messaging tool does your team use today?
Customer: Microsoft Teams.
AI: How many people would handle customer conversations?
Customer: Five.
AI: When are you hoping to get started?
Customer: This month. Can someone show us a demo?
AI, after the configured handoff triggers: I'll pass this to our sales team so they can help with the next step.
Your team can review the conversation before answering, including what the customer needs and which questions the AI already asked. With the response mode configured earlier, the AI steps aside when an agent replies.
If nobody is available, use an honest follow-up message and collect any missing contact information conversationally. Test this from WhatsApp with your team offline so you know exactly what the customer sees.
Qualification does not automatically create a CRM record or book a meeting. If those are part of your workflow, configure and test the relevant AI Actions separately.
Outside the 24-hour window, the AI and your agents cannot continue sending ordinary free-form WhatsApp replies. Use an appropriate approved template where permitted, or wait for the customer to message again.
Review campaign results and follow up
Go to Outbound > Campaigns and open your broadcast. Review delivered, read, replied, failed, skipped, and opt-out results.
- Use Recipients to inspect individual delivery outcomes and failure reasons.
- Use Replies to open conversations and review how the AI handled them.
- Use Export CSV when you need recipient-level results.
- Use Retarget to create a follow-up draft for a group such as “Read, didn't reply” or “Replied”.
Consent and frequency checks run again for follow-ups. A recorded read is not a customer reply and does not open the 24-hour window. Use an approved template when the window is closed.
Read receipts depend on recipient privacy settings, so a missing read receipt does not prove someone ignored the message. Review the actual conversations before treating every reply as a qualified lead.
For a useful sales review, track qualified conversations, successful handoffs, and booked next steps alongside delivery and reply rates. Use your conversation review or configured CRM workflow for those outcomes.
Related guide: Broadcast Reports and Retargeting.
Troubleshooting
| Problem | What to check |
|---|---|
| The broadcast cannot send. | Check template approval, payment status, Reach exclusions, and plan and Meta limits. Error 141006 indicates a Meta payment-method problem. |
| The AI doesn't answer replies. | Check the number-to-widget mapping, enabled AI agent, response mode, and model credentials. |
| The AI doesn't understand the offer. | Add the actual offer and its terms to knowledge, retrain, and test a short reply such as “Yes”. Don't rely on generic product knowledge alone. |
| The AI says it will transfer, but the team receives nothing. | Verify the handoff settings or routing action, its trigger, selected destination, and bot access. Test the full path from WhatsApp. |
| Some contacts are skipped. | Review Reach and recipient-level reasons. Audience membership does not override consent, personalization, frequency, regional, or conversation checks. |
| The campaign is waiting. | Check its scheduled time, time zone, send window, review status, and whether sending is paused. |
| The AI and a person both keep replying. | Use the response mode that drops the AI when an agent answers. With coexistence, agree who will answer from the phone app versus Social Intents. |
Before your first full send
Confirm the right number and widget, approved template, accurate consent records, trained campaign knowledge, personalization fallbacks, and tested human handoff. Then start with a small audience, review the conversations, and adjust your instructions before expanding the campaign.