
Microsoft Teams Live Chat Is Retiring: Best Alternative for 2026
Microsoft Teams Live Chat Is Shutting Down: How to Switch to Social Intents
Microsoft's built-in Teams Live Chat will stop working on October 5, 2026. This is not a typical end-of-support date. Microsoft says incoming messages will no longer be relayed to Teams, and any Microsoft Live Chat widgets left on websites will be hidden.
If your team currently depends on the Microsoft live chat widget, you need to replace it before that date.
The simplest path is to move your website chat workflow to Live Chat by Social Intents. Your visitors will use a new chat widget on your website, but your employees can continue receiving and answering conversations directly in Microsoft Teams.
Important: Microsoft's retirement only applies to its own built-in Live Chat feature. Live Chat by Social Intents is a separate Microsoft Teams app and will continue to operate normally.
You can install Live Chat by Social Intents from Microsoft Marketplace or use the direct Microsoft Teams installation link.

In this guide, we'll walk through the complete migration process.
What Changes During the Migration?
This migration does not move your employees away from Microsoft Teams. It changes the service that provides the website widget and carries messages between your website and Teams.
Here is the basic change:
- Remove Microsoft's retiring website widget.
- Add the Social Intents Live Chat widget to your website.
- Connect Live Chat by Social Intents to a public Team and channel.
- Continue answering website visitors from Microsoft Teams.
Your historical Microsoft Live Chat conversations are not automatically imported into Social Intents. Existing Teams channels and associated Microsoft Lists data remain in Microsoft 365 according to your tenant's retention policies. New conversations are stored in Social Intents after you complete the switch.
Why You Need to Move Before October 5, 2026
Microsoft stopped allowing new customers to set up its built-in Teams Live Chat on August 6, 2026. On October 5, 2026, the service reaches end of support.
After that date:
- Website chats will no longer be relayed through Microsoft's widget.
- New customer conversations cannot be started through the widget.
- AI escalations and other customer interactions cannot be started through the widget.
- Microsoft will hide widgets that are still embedded on websites.
Microsoft instructs customers to remove the old widget before the retirement date. You can review the details in Microsoft's Live Chat retirement FAQ.
For more background on the announcement and how the two products compare, read our Microsoft Teams Live Chat retirement overview.
Waiting until October 5 creates an avoidable gap. Install and test the Social Intents widget first, then replace the Microsoft widget on your production website.
What You Gain with Live Chat by Social Intents
Microsoft's built-in Live Chat provided a basic website-to-Teams connection and limited the handoff support team to 25 users. Live Chat by Social Intents keeps the Teams workflow and adds a larger customer support feature set.
With Social Intents, you can:
- Add unlimited agents without per-seat pricing.
- Add AI chatbots powered by ChatGPT, Claude, or Gemini.
- Train AI using website pages, help content, PDFs, and business documents.
- Escalate AI conversations to a human agent in Microsoft Teams.
- Create multiple widgets for different websites, brands, or departments.
- Route chats to separate Microsoft Teams channels.
- Customize widget colors, logos, text, forms, and languages.
- Set online schedules and collect messages when agents are offline.
- Send proactive chat invitations using timed and page-level targeting.
- Use saved replies and shortcuts for common questions.
- Transfer chats between team members.
- Share files and images with website visitors.
- View visitor details, including name, email address, and current page.
- Connect WhatsApp, SMS, and Facebook Messenger to Teams.
- Use Custom AI Actions to retrieve information or trigger workflows.
- Review searchable chat history, transcripts, ratings, and reports.
You can start with human live chat only. AI and additional messaging channels are optional and can be added later.
Before You Begin
Gather the following information from your current Microsoft setup:
- The websites where Microsoft's Live Chat widget is installed
- The Team members currently handling chats
- The Teams channel used for customer requests
- Your business hours and time zone
- Your online greeting and offline message
- The visitor information you currently collect
- Your logo, colors, and preferred chat language
- Any AI, escalation, or appointment booking workflows
- Any historical chat or customer data you need to preserve
You will also need:
- Permission to install third-party apps in Microsoft Teams
- Access to the Team and channel that will receive chats
- Access to update your website code, tag manager, or WordPress installation
- A public Teams channel for Live Chat notifications
Important: Use a Public Teams Channel
Add Live Chat by Social Intents to a public Team and channel. Microsoft Teams does not allow the bot interaction required for chat notifications in private channels.
You can create a new public channel for website chats or add the app to an existing public channel used by your support team.
Microsoft Settings to Recreate in Social Intents
Settings are not copied automatically from Microsoft's built-in Live Chat. Use this table as a migration checklist.
| Microsoft Built-In Live Chat Setting | Social Intents Location |
|---|---|
| Business name and logo | Live Chat Settings, then General |
| Welcome message and visitor-facing text | Live Chat Settings, then Customize Text |
| Support team members | Teams channel membership and Agent Settings |
| Business hours | Live Chat Settings, then Online Schedule |
| Offline contact collection | Offline form and availability settings |
| Website chat fields | Customize Text and pre-sales questions |
| Teams destination | General settings and Teams chat routing |
| Website widget code | Live Chat Settings, then Install Code Snippet |
| AI chatbot | Chatbot Settings |
| AI-to-human escalation | Chatbot invitation and escalation settings |
| Page visibility rules | Targeting |
| Saved agent responses | Shortcuts |
| Custom widget styling | General settings, CSS, and JavaScript |
If you used Microsoft's appointment booking option, record the booking URL and process separately. Appointment settings do not move automatically with the widget. You can add your booking link to visitor-facing text, quick replies, or your support team's saved responses.
Step 1: Install Live Chat by Social Intents
Start by opening Live Chat by Social Intents in Microsoft Marketplace.
Select Get it now and follow the prompts to open Microsoft Teams.
You can also install the app directly inside Teams:
- Open Microsoft Teams.
- Select Apps from the left sidebar.
- Search for Live Chat.
- Select Live Chat by Social Intents.
- Select Add.
Make sure the publisher is shown as Social Intents. This is different from Microsoft's retiring built-in Live Chat feature.
If the app does not appear, ask your Teams administrator to confirm that your organization's app policies allow third-party Teams apps.
Step 2: Add Live Chat to Your Team and Channel
Adding the personal app is not enough to route website chats to a shared channel. You must also add Live Chat to the Team and channel where agents will receive requests.
- Open the public Team and channel you want to use.
- Select the + button at the top of the channel.

- Search for Live Chat.
- Select Live Chat by Social Intents.

- Select Save to add the Live Chat tab.
- Select Sign in with Microsoft in the Live Chat tab.
- Sign in using your Microsoft Teams account.


Signing in completes the connection and creates your Social Intents trial if you do not already have an account.
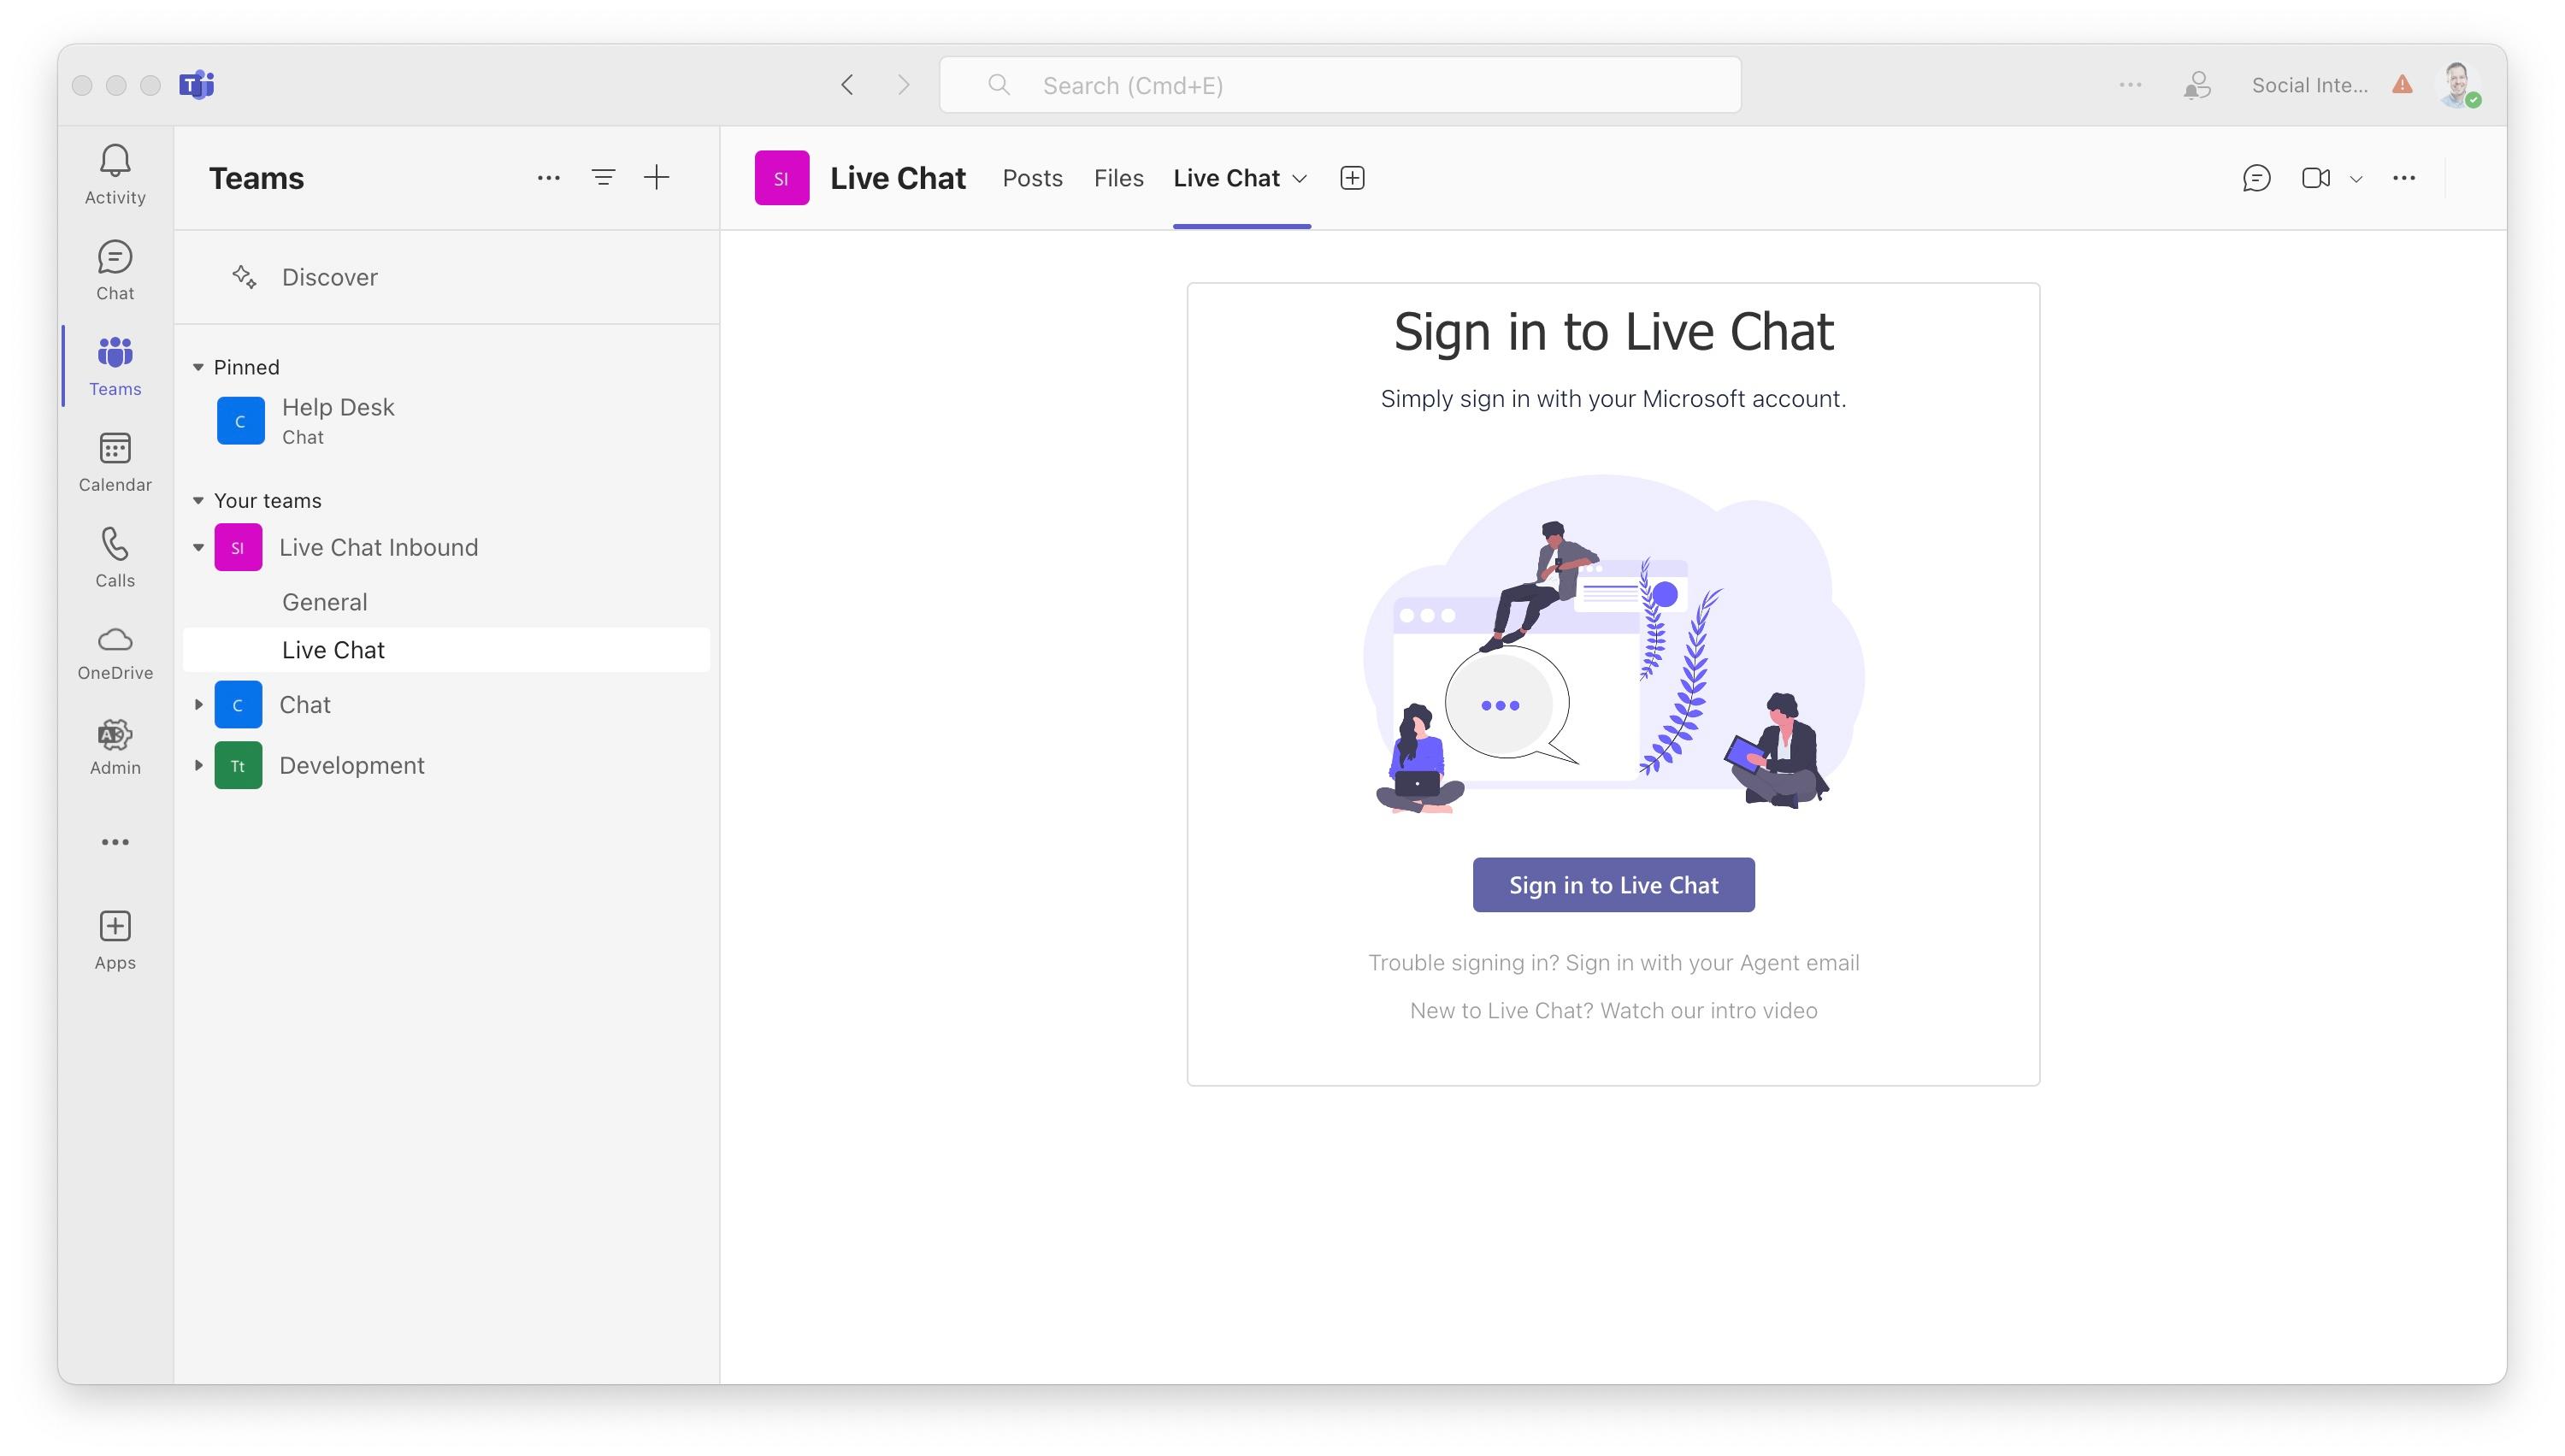
If you already use Social Intents with a different email address, signing in through Teams may create a second account. Contact us at our website and we can help merge the accounts.
You can add Live Chat to additional public Teams channels if you want separate routing for sales, support, languages, websites, or brands.
Step 3: Add Live Chat to Each Agent's Personal Workspace
Each agent should also add the Live Chat app to the Teams left sidebar.
- Select the three dots in the Teams left sidebar.
- Search for Live Chat.
- Select Live Chat by Social Intents.
- Select Add if it is not already installed.
- Pin the app if the agent wants it to remain visible in the sidebar.
The personal app gives each team member access to:
- Live Chat Settings
- Agent Settings
- Their display name, nickname, photo, and job title
- Active and historical chat information
- Plan and account information
Adding the channel tab controls shared routing. Adding the personal app gives each agent access to their own settings. Complete both steps.
Step 4: Recreate Your Widget and Routing Settings
Open Live Chat from the Teams left sidebar, then select Live Chat Settings.
Start with the General settings:
- Enter a name for your chat widget.
- Select the Microsoft Team and channel that should receive chats.
- Add your company logo.
- Choose the chat tab and widget colors.
- Configure your online and offline behavior.
- Save your changes.
Next, open Customize Text and recreate the visitor experience:
- Welcome message
- Online and offline text
- Name and email fields
- Pre-sales questions
- Button labels
- System messages
- Preferred language
Open Online Schedule and enter your normal support hours and time zone. Decide what visitors should see outside those hours. You can display an offline message form, allow AI to answer, or hide the widget when offline.
Open Agent Settings and have each agent add the name, photo, nickname, and title that visitors should see.
If you have more than one widget or department, confirm the Teams routing for each widget before installing any code.
Step 5: Configure Teams Notifications
New Posts notifications may be disabled by default in Teams. Turn them on so your agents see incoming chat requests.
- Find the Teams channel where Live Chat is installed.
- Select the three dots next to the channel name.
- Open Channel notifications.
- Set new posts to Banner and feed or Only show in feed.
- Save the notification settings.
Each agent controls their own Teams notification preferences. Ask every person who handles chats to confirm their settings.
Step 6: Configure an AI Chatbot, If Needed
AI is optional. Skip this step if your team wants agents to handle every conversation.
To add AI:
- Open Live Chat Settings.
- Select Chatbot Settings.
- Choose the AI provider and model you want to use.
- Add your website pages, help articles, PDFs, or documents as training content.
- Enter the chatbot name, welcome text, and instructions.
- Choose when the chatbot should participate.
- Configure human escalation rules.
- Save and test the chatbot.
You can have AI:
- Answer as soon as a conversation begins
- Answer only when agents are offline
- Pick up chats that your team misses
- Collect information before inviting a human
- Escalate when a visitor asks for a person
- Route specific requests to a Teams channel
Microsoft Copilot Studio settings and training data are not imported automatically. Recreate the instructions and escalation rules you want Social Intents to use, then test the questions your visitors ask most often.
Step 7: Get Your Social Intents Website Code
From the Live Chat app in Teams:
- Open Live Chat Settings.
- Select Install Code Snippet.
- Copy the complete Social Intents widget code.
For a standard HTML website, paste the code immediately before the closing </body> tag. If your platform does not provide access to that location, place the snippet anywhere inside the page's <body> section.
If you use WordPress, you can install the Social Intents plugin and enter your Widget Key. The Widget Key is available under the code snippet settings. You can also add the JavaScript snippet using your theme, a code-injection plugin, or a tag manager.
Use only one installation method. Adding the plugin and the JavaScript snippet at the same time can display the widget twice.
Step 8: Test Before Removing Microsoft's Widget
Do not remove the Microsoft widget until the Social Intents setup has passed a complete test.
Use the Preview option in Live Chat Settings to open a test page containing your new widget.
Run this test:
- Open the preview page in a private or incognito browser window.
- Enter the same visitor information you collect on your website.
- Start a test conversation.
- Confirm that a new request appears in the correct Teams channel.
- Select Open Chat Console or Join Chat.
- Send a reply from Teams.
- Confirm that the reply appears in the website widget.
- Close the conversation and confirm it appears in History.
If you reply from the Teams Posts tab using Join Chat, mention @Live Chat in the agent response so the message is sent to the visitor. Messages between coworkers that do not mention the Live Chat bot remain internal.
Also test:
- Desktop and mobile layouts
- Teams desktop and mobile notifications
- Online and offline schedules
- The offline message form
- AI answers and human escalation
- File and image sharing, if used
- Multiple department or website routes
- Widget targeting rules
- Chat transcripts and ratings
Fix any routing, notification, branding, or availability problems before changing the production website.
Step 9: Replace Microsoft's Widget on Your Website
Microsoft identifies its built-in widget with a script tag that includes id="chatbot".
Search every website, theme, tag manager, and plugin for the old Microsoft code. Keep a copy of the original code and its location for your deployment records.
For the production change:
- Remove the Microsoft
<script id="chatbot">code. - Add the Social Intents code snippet or enable the Social Intents WordPress plugin.
- Publish the website changes.
- Clear your website cache and CDN cache.
- Open the website in a private browser window.
- Confirm that only one chat widget appears.
- Send another complete test chat to Microsoft Teams.
Check more than the homepage. Test pricing pages, support pages, landing pages, mobile pages, and any separate regional websites where the Microsoft widget was installed.
Step 10: Preserve Your Microsoft Live Chat Data
Microsoft says existing Teams channels and associated Microsoft Lists data will remain available according to your Microsoft 365 retention and lifecycle policies.
That data is not transferred into Social Intents automatically.
Before completing the migration:
- Review your Microsoft 365 retention requirements.
- Identify the Teams channels and Lists that contain Live Chat information.
- Export any customer, support, sales, or compliance records you need to preserve independently.
- Document where the exported information is stored.
- Confirm who will have access to the historical records.
After the switch, new conversations will appear in Social Intents History and reporting.
Final Migration Checklist
Use this checklist before marking the migration complete:
- Live Chat by Social Intents is installed from Microsoft Marketplace.
- The app is connected to a public Team and channel.
- Each agent has added the personal Live Chat app.
- Each agent has reviewed their display name and photo.
- Teams channel notifications are enabled.
- Widget branding and visitor-facing text are complete.
- Business hours and offline behavior are configured.
- Pre-chat fields match your requirements.
- Teams routing is correct for every widget.
- AI and escalation rules have been tested, if enabled.
- The Social Intents widget works on desktop and mobile.
- Agents can receive, join, reply to, and close chats from Teams.
- The old Microsoft
<script id="chatbot">code has been removed. - Website and CDN caches have been cleared.
- Only one widget appears on the website.
- Historical Microsoft data has been reviewed or exported.
- The new setup is being monitored for missed chats.
Troubleshooting
Live Chat Does Not Appear in the Teams App Store
Your organization's Teams app policy may block third-party apps. Ask a Teams administrator to allow Live Chat by Social Intents or approve the app for your users.
You can also open the Microsoft Marketplace listing and select Get it now.
Chat Requests Do Not Appear in the Teams Channel
Check the following:
- Live Chat was added to the Team, not only to your personal sidebar.
- The Team and channel are public.
- You completed Sign in with Microsoft from the channel tab.
- The widget is routed to the correct Team and channel.
- The agent is a member of that Team.
- Channel notifications are enabled.
If expected channels do not appear in the routing list, completely remove and re-add the Live Chat app to the Team. Removing only the tab may not refresh the connection.
Agents Can See a Request but Replies Do Not Reach the Visitor
Use Open Chat Console to reply from the dedicated Live Chat tab. If replying from the Teams Posts tab, make sure the response mentions @Live Chat.
Two Chat Widgets Appear on the Website
The widget code is installed more than once. Check your theme, tag manager, WordPress plugin, and code-injection plugins. Remove the duplicate installation and clear the site cache.
The Widget Is Missing Outside Business Hours
Review Online Schedule and the option that hides the widget when agents are offline. Choose whether to show an offline form, allow an AI chatbot to answer, or hide the widget.
Signing In Created a New Social Intents Account
This can happen when your Microsoft Teams email address differs from the address on an existing Social Intents account. Contact support@socialintents.com for help merging the accounts.
Frequently Asked Questions
Does Microsoft's Teams Live Chat retirement affect Live Chat by Social Intents?
No. Microsoft is retiring its own built-in website Live Chat feature. Live Chat by Social Intents is a separate Microsoft Teams app and continues to operate normally.
Can we keep using the same Microsoft Team?
Yes. Add Live Chat by Social Intents to any public Team and channel you want your agents to use. You can keep a familiar support channel or create a new one for the migration.
Are our Microsoft Live Chat settings imported automatically?
No. Recreate your branding, visitor text, business hours, support routing, contact fields, AI settings, and escalation rules in Social Intents.
Are our old Microsoft Live Chat conversations imported?
No. Historical conversations remain in Microsoft 365 according to your tenant's retention policies. Export anything you need to preserve. Social Intents begins storing new history after your widget goes live.
Do website visitors need Microsoft Teams?
No. Visitors use the chat widget on your website. Only your employees use Microsoft Teams to receive and answer conversations.
Can we use Live Chat by Social Intents without AI?
Yes. You can use human live chat only, AI only, or combine AI with human escalation to Microsoft Teams.
Is there a limit of 25 support users?
No. Social Intents plans include unlimited agents. You can add your support, sales, and customer success teams without paying for each additional agent.
When should we complete the migration?
Complete the migration and production testing before October 5, 2026. That is the date Microsoft's built-in service stops relaying new chats to Teams.
Start Your Migration
Install Live Chat by Social Intents from Microsoft Marketplace, add it to a public Teams channel, and send your first test conversation.
Once the Social Intents widget is working, replace Microsoft's retiring code on every website where it is installed. Your visitors get a new live chat and AI experience, while your team continues answering customers from Microsoft Teams.