How to Build an AI Chatbot with Google Chat and ChatGPT
In this article, we're going to show you how you can build an ChatGPT Chatbot for your website with Google Chat and ChatGPT to power your website customer service. With this chatbot powered by Google Chat and ChatGPT you can train the AI chatbot on your website content to answer your visitor support questions, then escalate chats to your agents in Google Chat.
Your team can respond to your customer queries right from Google Chat directly so you don't need to add yet another messaging tool to your customers service suite.
With a simple code snippet, you can enable an advanced live chat application that can route to any Google Chat space or user so you can answer chats and offer great customer service right within Google Chat. Lower your customer service costs and increase your sales by providing chat support when and where your customers need it.
Here are some things you can do with your AI Chatbot and Google Chat:
- Pre-qualify your leads with a pre-sales page
- Use ChatGPT to answer visitor questions
- Train your chatbot on your website data, docs, pdfs, and spreadsheets
- Integrate your website chat directly with your team in Google Chat
- Set up agent escalation triggers for your hybrid AI Chatbot to send chats to Google Chat
- Answer chats from any space in Google Chat
- Answer chats as Direct Messages in Google Chat
- Customize your chat colors, text, logos, and hours of operation
- Create chat history reports and dashboards
- Integrate your chat leads with 100's of 3rd party systems
Here's a step by step guide to build an AI Chatbot with Google Chat and ChatGPT
Prerequisites
- A Google Chat or Gmail Workspace account: https://chat.google.com
- A Social Intents Account: https://www.socialintents.com
High Level Steps
- Add Live Chat app to Google Chat
- Customize your Live Chat Settings
- Create your OpenAI account
- Add your OpenAI API Key to Social Intents
- Train your ChatGPT Chatbot on your website data
- Copy your Live Chat snippet to your website
Let's get started!
1. Add Live Chat app to a Google Chat space
The first step to add Live Chat to Google Chat is install Live Chat from the Google App Marketplace. Add the Live Chat application to a Space for the best experience so you can have your whole team answer customer questions from your website.
 Choose a space to add the app to in Google Chat or create a new Space dedicated to your Live Chat. You can also add the app directly from Google Chat or Gmail as below.

Next search on the 'Live Chat' app in the search field.
 Click the '+' button next to the message field to add an application as seen below.
 Once you add the Live Chat application, you'll receive a welcome message form our chat bot with some slash commands you can use as well las getting started links including a Preview Chat link that you can use to test our your Live Chat integration. This welcome also includes a link to Sign in to Live Chat here on Social Intents.

2. Login and Customize your Live Chat Settings
Next, you can login to your Live Chat account at Social Intents to customize your chat widget settings. Once you've added the Live Chat app to a space, you already have an account with us. Simply click 'Sign in with Google' and use the same email address where you added the live chat app.

Once you login, you'll see the Dashboard in Social Intents. To access your settings, select 'My Apps' in the left side bar, then click edit settings on your Live Chat widget. You can change where your chats are routed to, change the tab color, add AI to your live chat, or set up 3rd party integrations.
 You also have access to Live Chat reports and integrations you can set up here to send transcripts and leads to your CRM, marketing, or ticketing systems.

3. Create your OpenAI account
If you haven't already, sign up for your OpenAI account here.
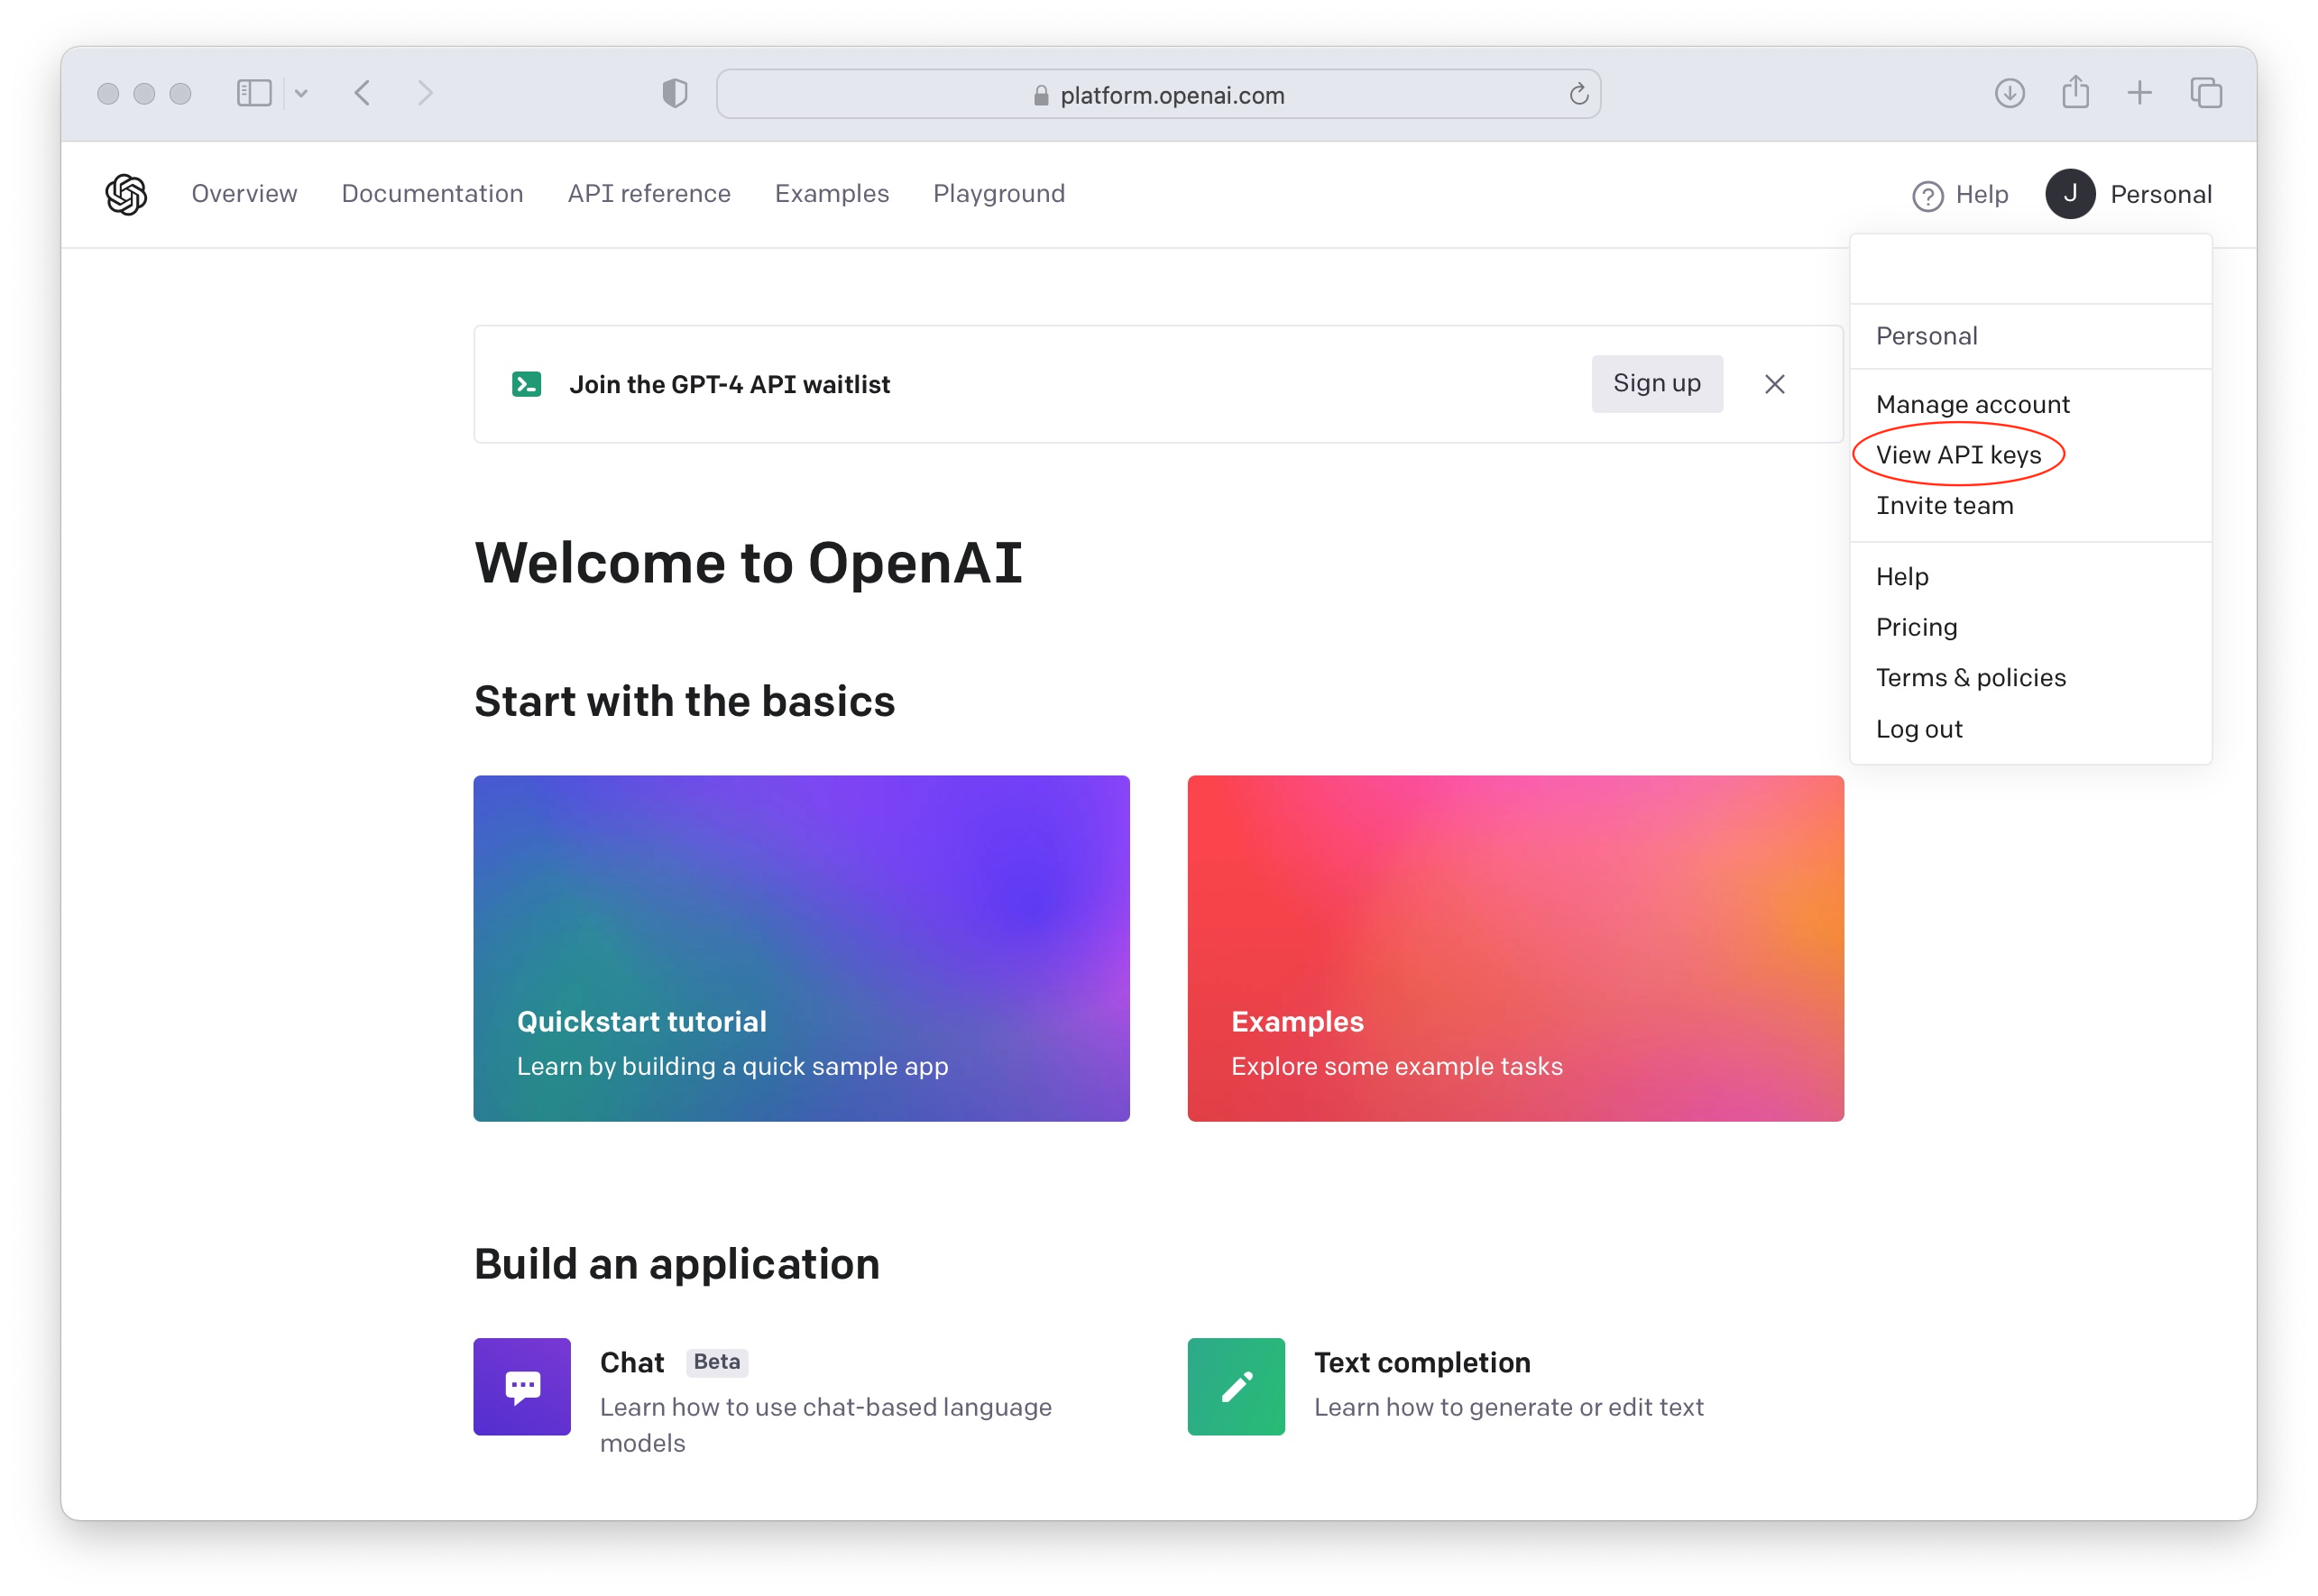
 Once logged in to OpenAI, click on your profile and select 'View API keys'
Now create a new API Key to use in your Social Intents Chatbot Settings for integration.

Make sure to add Billing Information to OpenAI
The ChatGPT API is only enabled on paid OpenAI plans. Otherwise you'll see an error message response like the following from our chatbot integration:

You can check and add your billing information here:
4. Add your OpenAI API Key to Social Intents
Now that you have added Live Chat to Google Chat and created your OpenAI account, click on the Chatbot Settings tab in Social Intents.
In your Chatbot Settings name your bot, choose an avatar for the chat bot and select Chatbot Type of 'ChatGPT with OpenAI'.
You can then decide how you want your chatbot to be invited into the chat. You can have a chatbot only, then invite agents later, have it pick up only when your live chat agents are offline or miss a chat, or join the same time your agents join.
For ChatGPT Model, you can choose any of the models the OpenAI supports with the Chat API: https://platform.openai.com/docs/guides/chat
We choose the current chat model: gpt-3.5-turbo.
Copy your OpenAI API Key into the field called: ChatGPT API Key.

Next you can customize your ChatGPT Welcome text with a Default Welcome Response, and Quick Reply buttons to help direct your users.
The Human Escalation trigger phrases can be used to match on user intent when they want to reach to a live agent. When one of these phrases is matched, we invite your human agents by sending Live Chat Invites to Microsoft Teams, Slack, Zoom, or Webex.
Once your agents answer the chats, then the bot drops out of the conversation.
Make sure to customize the ChatGPT Instruction Phrases to point to your website url to help guide ChatGPT on the types of answers to provide.

Want more info on Chatbot Settings?
If you'd like more details on each Chatbot Settings field, you can check out this article:
https://help.socialintents.com/article/200-chatgpt-chatbot-settings
5. Train your ChatGPT Chatbot with your Website Content
There are 2 parts to training your ChatGPT chatbot. The first is to use the Instruction Phrases to allow to you send an initial System message when starting a chat to give your ChatGPT bot some context.
Generally you can use this to convey tone, types of answers, where to point visitors, etc.
Now, you can train ChatGPT with your own content easily! Simply click on the 'Train your chatbot' button in the chatbot settings and you'll be taken to a page where you can list URL's you can use to train the bot.
Enter a base domain or individual urls to add as content to train. Then click Train All to train your ChatGPT chatbot on your own content.

Now your chatbot will answer questions specific to the content you've provided it!
6. Copy your Live Chat Code Snippet to your Website
Now just copy the Live Chat code snippet to your website to enable the ChatGPT chat on your site.
 Grab your code and add to your html template:

That's it! Your Google Chat + AI ChatGPT Chatbot is added on your website!
Now your website chatbot powered by ChatGPT is enabled on your website and is ready to answer your visitor questions!

Get Started with Google Chat and ChatGPT on your website today!
Start your 14-Day Free trial at Social Intents to add ChatGPT to your website in under 5 minutes. It's as simple as adding your OpenAI API Key into your chatbot settings!